If your black car’s paint looks dull and uneven because of that frustrating orange peel texture, you’re not alone—and there’s a way to fix it. Orange peel makes your car’s finish look bumpy and rough instead of smooth and glossy.
But don’t worry, you can restore that deep, mirror-like shine by learning how to wet sand your black car correctly. In this guide, you’ll discover simple steps to safely remove orange peel, the right tools to use, and insider tips to avoid common mistakes.
Ready to bring back that flawless finish and make your black paint truly stand out? Keep reading, because your car deserves the best look possible—and you can achieve it yourself.
Preparing The Car Surface
Preparing the car surface is the first and most important step in wet sanding black cars. This step ensures the paint is ready and clean for sanding. Proper preparation helps avoid scratches and damage during the sanding process. It also makes the sanding smoother and more effective.
Cleaning And Drying
Start by washing the car thoroughly with car soap and water. Use a microfiber cloth or sponge to remove dirt and dust. Clean the surface well to avoid trapping debris under the sandpaper. After washing, dry the car completely with a clean, soft towel. Any moisture left can affect the sanding process.
Masking Sensitive Areas
Cover areas that should not be sanded. Use painter’s tape and plastic sheets to protect trim, badges, and edges. Masking prevents accidental sanding on glass, rubber, and chrome parts. Take your time to mask carefully for a clean sanding job. Proper masking saves time and protects your car’s details.
Credit: www.detailedimage.com
Choosing Sandpaper Grit
Choosing the right sandpaper grit is critical for wet sanding black cars to remove orange peel. The grit affects how much clear coat you remove and how smooth the surface becomes. Using the wrong grit can cause deep scratches or uneven sanding. Start with a coarser grit to level the surface, then move to finer grits for refinement and polishing prep.
Initial Leveling Grit
Start with 1500 or 2000 grit sandpaper for initial leveling. This grit removes the orange peel texture without cutting too deep. It smooths the high spots while leaving the surface even. Keep the sandpaper wet to avoid heat damage and clogging. Work gently to prevent sanding through the clear coat.
Refinement Grit
After leveling, switch to 2500 or 3000 grit sandpaper. This grit refines the surface by removing scratches from the initial sanding. It prepares the paint for polishing by making it smoother. Use plenty of water and light pressure during this step. Check the surface often to ensure even sanding.
Pre-polish And Final Polish Prep
Use 3000 to 5000 grit sandpaper for pre-polish and final polish prep. These ultra-fine grits remove any minor sanding marks left behind. They make the surface glass-smooth and ready for polishing compounds. Sand with very light pressure and plenty of lubrication. This step is key for achieving a mirror-like finish on black paint.
Wet Sanding Techniques
Wet sanding is a careful process that smooths the surface of black car paint. It helps remove the orange peel texture, making the paint look flat and glossy. Proper techniques protect the paint and give a clean finish. This section explains key wet sanding methods to follow for the best results.
Using A Foam Sanding Block
A foam sanding block holds the sandpaper firmly and spreads pressure evenly. This stops the sandpaper from digging into the paint too much. It also helps you control sanding on curved or flat areas. Use a block that fits the size of the section you are working on.
Maintaining Proper Lubrication
Keep the surface wet with water mixed with a few drops of soap. Lubrication stops the sandpaper from scratching the paint deeply. Spray water often while sanding to rinse away dust and grit. This reduces heat and helps the sandpaper glide smoothly.
Sanding Direction And Pressure
Sanding in straight lines helps keep the surface even. Avoid circular motions that can cause uneven marks. Use light, steady pressure to control how much paint you remove. Pressing too hard may create scratches or damage the clear coat.
Working In Small Sections
Focus on small areas at a time for better control and attention. This prevents sanding over areas that are already smooth. Clean and check the section before moving on to the next. Small sections allow for careful progress and a consistent finish.
Credit: www.drbeasleys.com
Checking Progress
Checking progress during wet sanding is key to a smooth, flawless finish. It helps you avoid sanding too much or too little. This step ensures the orange peel texture fades evenly. You must watch carefully for changes in the paint surface. Regular inspection keeps your work precise and controlled.
Frequent Rinsing
Rinse the area often with clean water. This removes sanding residue and dust. It also reveals the true surface condition under the water film. Use a spray bottle or hose with gentle pressure. Keep the surface wet to prevent scratches. Frequent rinsing helps you see small imperfections clearly. It prevents clogging of the sandpaper and maintains sanding efficiency.
Wiping And Feeling Surface Smoothness
After rinsing, gently wipe the area with a soft microfiber cloth. This dries the surface just enough to feel it. Run your fingers lightly across the paint to check for rough spots. Smoothness shows the orange peel is wearing down. If you feel bumps or texture, continue sanding gently. Touch is a good guide when visual clues are unclear. Repeat rinsing and wiping to track progress accurately.
Polishing After Wet Sanding
Polishing after wet sanding is essential to restore your black car’s shine and remove sanding marks. This step refines the surface, making the paint smooth and glossy. Proper polishing brings out the deep, rich color black cars are known for. It also helps eliminate any haze or dullness left from sanding. The right technique and tools ensure a flawless finish without damaging the paint.
Choosing The Right Polishing Compounds
Select a polishing compound that matches the sanding grit used. Start with a medium-cut polish to remove sanding scratches. Follow with a fine polish to enhance gloss. Avoid harsh compounds that can cause swirl marks. Look for products designed for dark or black paint. These help reduce holograms and improve depth. Always test the polish on a small area first.
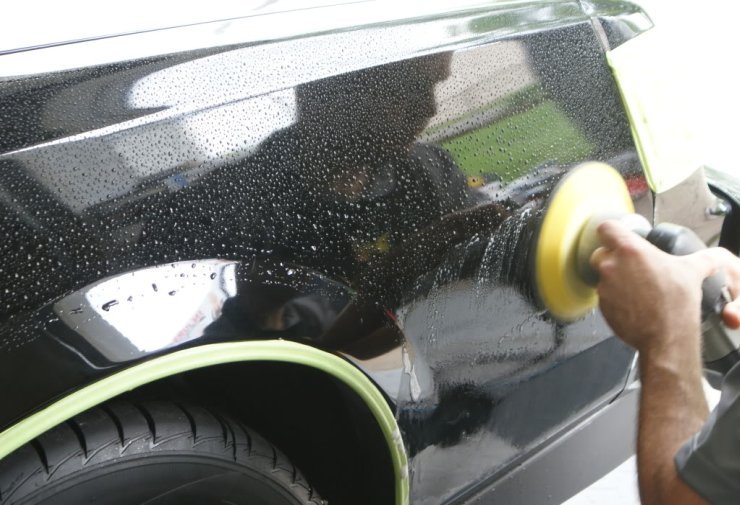
Using A Dual Action Polisher
A dual action polisher offers control and safety for beginners. It reduces the risk of burning the paint. Use a soft foam pad with the compound. Work in small sections with slow, overlapping passes. Keep the polisher moving constantly to avoid heat buildup. Clean the pad often to prevent clogging. Finish by wiping the area with a microfiber cloth to check the shine.
Hand Polishing Tips
Hand polishing works well for small spots or touch-ups. Use a soft foam or microfiber applicator pad. Apply polish in circular motions with light pressure. Check your progress frequently by wiping with a clean cloth. Take breaks to avoid fatigue and uneven polish. Hand polishing takes more time but allows careful control. It’s perfect for delicate areas or edges.
Common Mistakes To Avoid
Wet sanding black cars to remove orange peel requires patience and precision. Many beginners make mistakes that can damage the paint or worsen the finish. Avoiding common errors helps achieve a smooth and glossy surface. Here are some critical mistakes to watch out for during the process.
Skipping Lubrication
Never sand without proper lubrication. Water mixed with a few drops of soap keeps the surface wet. This prevents the sandpaper from clogging and reduces the risk of deep scratches. Dry sanding can ruin the paint quickly. Always spray enough liquid to keep the area slick.
Applying Excessive Pressure
Pressing too hard damages the clear coat and paint beneath. Light, even pressure works best to remove orange peel gently. Heavy pressure may create uneven spots or sanding marks. Use a sanding block or pad to spread pressure evenly. Let the sandpaper do the work, not your force.
Rushing Grit Progression
Move through sandpaper grits slowly and carefully. Start with coarse grit to level the surface, then gradually switch to finer grits. Skipping steps leaves scratches that are hard to polish out. Take time to check your work between grits. Proper grit progression ensures a smooth, flawless finish.
Tools And Materials Checklist
Gathering the right tools and materials is the first step to wet sanding black cars. Proper equipment ensures a smooth process and better results. This checklist covers everything needed to remove orange peel effectively.
Sanding Blocks And Sandpaper
Use sanding blocks to hold sandpaper flat and apply even pressure. Choose wet/dry sandpaper with grits from 1000 to 3000. Start with coarser grit to level the surface, then move to finer grit for smoothness. Soft sanding blocks help avoid deep scratches on black paint.
Lubricants And Cleaning Supplies
Keep the surface wet with a lubricant to prevent scratches. Use water mixed with a few drops of dish soap in a spray bottle. Clean the car area thoroughly before sanding to remove dirt and debris. Rinse the sandpaper often to keep it clean and effective.
Polishing Pads And Compounds
After sanding, polishing pads help restore shine to the paint. Use foam or microfiber pads for best results. Select polishing compounds made for automotive paint correction. Start with a medium compound, then finish with a fine polish for a glossy surface.
Protective Tape And Towels
Use masking tape to protect edges, trims, and areas not being sanded. Soft microfiber towels are ideal for wiping and buffing. Keep towels clean and dry to avoid adding scratches. Always protect your hands with gloves to stay safe during sanding and polishing.
Maintaining The Finish
Maintaining the finish of your black car after wet sanding is essential. It keeps the paint smooth and glossy. Proper care prevents new orange peel from forming. Consistent attention extends the life of your hard work. Here are two key steps to keep your finish perfect.
Regular Washing And Waxing
Wash your car often to remove dirt and grime. Use a gentle car shampoo to protect the paint. Avoid harsh soaps that can strip wax and damage the surface. Dry the car with a soft microfiber towel to prevent scratches. Apply wax every few months to seal the paint. Wax adds a protective layer that repels water and dirt. This layer also enhances the shine of your black paint. Regular waxing keeps the surface smooth and easier to clean.
Touch-up Techniques For Minor Imperfections
Small scratches and chips can appear even after wet sanding. Use touch-up paint to fix these spots quickly. Clean the area before applying any product. Use a fine brush to apply paint only where needed. Let the paint dry fully before polishing the spot gently. This prevents the damage from spreading and keeps your finish uniform. Addressing minor flaws early saves time and effort later. It also helps maintain the deep, glossy look of your black car.
Credit: www.youtube.com
Frequently Asked Questions
Does Wet Sanding Get Rid Of Orange Peels?
Wet sanding effectively removes orange peel by leveling the clear coat surface. Polishing alone cannot fix it. Always wet sand first, then buff and polish for a smooth finish.
What Grit Sandpaper To Remove Orange Peel From Car?
Use 1500 to 2000 grit sandpaper to wet sand and remove orange peel from your car’s paint.
What Grit Sandpaper Do You Wet Sand A Car With?
Use 1500 to 3000 grit sandpaper for wet sanding a car. Start with 1500 grit for orange peel removal, then refine with 2000-3000 grit. Always keep the surface wet to prevent scratches and achieve a smooth finish.
How To Remove Orange Peel From Car?
Use wet sanding with fine grit sandpaper (1500-3000 grit) and lubricant to smooth orange peel. Then, polish and buff the surface. Employ a sanding block for even pressure, rinse frequently, and work slowly in small sections to avoid damage. Finish with a high-quality polish for a glossy shine.
Conclusion
Wet sanding black cars removes orange peel effectively when done right. Keep the surface wet and use proper grit sandpaper for smooth results. Take your time and work in small sections for even sanding. Always follow sanding with polishing to restore shine and clarity.
With patience and care, your black car’s paint will look smooth and glossy again. Wet sanding is a valuable skill for improving your car’s finish. Try these steps carefully, and enjoy a flawless, professional look.