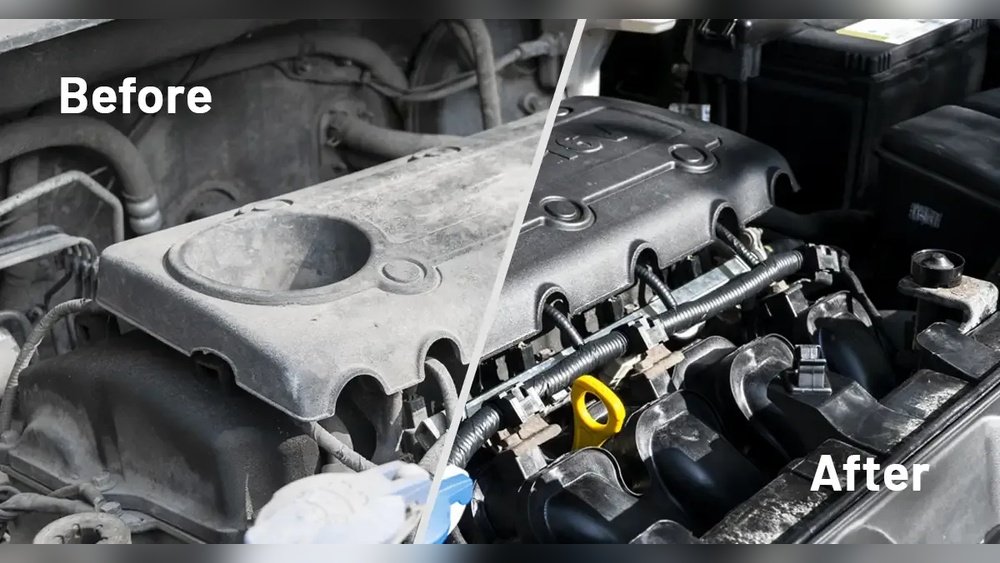
Your engine bay is more than just a hidden compartment—it’s the heart of your vehicle. Keeping it clean not only boosts your car’s appearance but also helps spot potential issues early and maintain optimal performance.
But if you’ve ever wondered how to tackle this task without risking damage, you’re in the right place. This step-by-step guide will walk you through the exact process professionals use to clean engine bays safely and effectively. By the end, you’ll know how to make your engine shine like new and impress anyone who pops the hood.
Ready to clean like a pro? Let’s get started!

Credit: www.crcindustries.com
Preparation And Safety
Preparing your engine bay for cleaning is the key to a safe and effective process. Taking the right steps avoids damage and helps achieve a professional result. Safety is as important as cleanliness. Follow these preparation tips before starting your engine bay cleaning.
Gathering Tools And Supplies
Collect all necessary tools before you begin. You need a degreaser, soft brushes, microfiber towels, and plastic bags. A spray bottle and a low-pressure hose help control water flow. Gloves protect your hands from chemicals. Having everything ready saves time and keeps the cleaning smooth.
Protecting Sensitive Components
Cover electrical parts like the battery, alternator, and fuse box with plastic bags. Seal them tightly to prevent water damage. Avoid spraying water directly on exposed wires or sensors. Protect air intakes and distributors as well. These steps prevent costly repairs from accidental water exposure.
Ensuring Engine Coolness
Never clean the engine while it is hot. A hot engine can cause burns or crack parts when cold water hits it. Let the engine cool for at least 30 minutes after driving. Check the temperature by touching the hood. Only start cleaning when the engine feels cool to the touch.

Credit: theragcompany.com
Initial Cleaning Steps
Starting the engine bay cleaning process correctly sets the stage for a thorough and safe job. The initial cleaning steps help remove dirt and protect sensitive parts. This preparation ensures the cleaning goes smoothly and prevents damage.
Removing Loose Debris
Begin by clearing out any loose dirt, leaves, and dust. Use a soft brush or compressed air to gently sweep away debris. This step helps avoid scratching the engine surfaces later. Removing loose debris also makes the next cleaning steps more effective.
Covering Electrical Parts
Protect electrical components before applying any liquids. Cover battery terminals, fuses, and exposed wiring with plastic bags or wrap. Secure the covers with rubber bands or tape to keep moisture out. This precaution prevents short circuits and damage to your engine’s electronics.
Choosing The Right Cleaning Products
Select cleaning products made specifically for engine bays. Use degreasers that break down oil and grime without harming plastic or metal parts. Avoid harsh chemicals that can cause corrosion. Choose gentle brushes and microfiber cloths to protect delicate surfaces while cleaning.
Degreasing The Engine Bay
Degreasing the engine bay is a crucial step in cleaning your car’s engine area. It removes built-up grease, oil, and dirt that can affect performance. A clean engine bay also makes it easier to spot leaks or damage early. Proper degreasing protects engine parts and keeps your vehicle looking fresh.
Applying Degreaser Properly
Choose a degreaser made for automotive engines. Spray it evenly over greasy surfaces. Avoid soaking electrical parts directly. Use a light mist to cover all dirty areas. Work in small sections for better control. Use gloves to protect your skin from chemicals.
Agitating With Brushes
Use soft or medium brushes to scrub the degreaser into grime. Focus on corners and crevices where dirt hides. Gentle scrubbing lifts grease without damaging parts. Use a toothbrush for tight spots. Brush in circular motions for best results. This step helps break down tough oil and dirt.
Allowing Dwell Time
Let the degreaser sit on the engine bay for 5 to 10 minutes. This dwell time loosens stubborn grease and dirt. Avoid letting the degreaser dry completely on surfaces. Keep the area shaded and cool during this process. Proper dwell time enhances cleaning power and saves effort later.
Rinsing And Drying
Rinsing and drying are critical steps in engine bay cleaning. They remove loosened dirt and prevent water damage. Proper rinsing ensures no soap residue remains. Drying stops moisture from harming electrical parts. Follow these steps carefully for a clean, safe engine bay.
Using Low-pressure Water
Use low-pressure water to rinse the engine bay. High pressure can force water into sensitive areas. Spray gently to avoid damage. Focus on areas with soap and grime. This method cleans without risking engine components.
Avoiding Water Puddles
Check for water puddles after rinsing. Puddles can cause rust and electrical issues. Tilt the vehicle slightly if possible. Use a cloth or towel to soak up standing water. Remove moisture quickly to protect your engine.
Drying Techniques
Dry the engine bay thoroughly after rinsing. Use microfiber towels for gentle drying. Air blowers or leaf blowers help reach tight spots. Avoid using heat guns as they may damage parts. Let the engine air dry completely before closing the hood.
Detailing And Finishing Touches
After thoroughly cleaning the engine bay, focus shifts to detailing and finishing touches. These steps enhance the look and protect surfaces for longer. Proper care of plastic and rubber parts prevents cracking and fading. Applying dressing brings back a fresh, like-new appearance. Finally, a careful inspection ensures no spots are missed and everything looks perfect.
Cleaning Plastic And Rubber Parts
Use a soft brush to remove dirt from plastic and rubber parts. Spray a gentle cleaner designed for these materials. Wipe them down with a microfiber cloth. Avoid harsh chemicals that can cause damage. Make sure to clean all nooks and crannies for the best result.
Applying Dressing
Choose a water-based dressing for a natural, non-greasy finish. Apply the dressing evenly using a foam applicator or cloth. Focus on plastic, rubber hoses, and seals. This step restores color and adds a protective layer. Let it dry completely for a lasting shine.
Final Inspection
Check the entire engine bay carefully. Look for missed dirt or streaks on surfaces. Wipe any remaining spots with a clean cloth. Verify that all components are dry and clean. Make sure wires and connectors are secure and tidy. A final inspection ensures your engine bay looks professional and well-maintained.

Credit: theragcompany.com
Maintenance Tips
Maintaining a clean engine bay is essential for your vehicle’s performance and longevity. Simple care routines keep the engine running smoothly and prevent costly repairs. Follow these maintenance tips to keep your engine bay spotless and well-protected.
Regular Cleaning Schedule
Set a cleaning schedule based on driving conditions. For dusty or muddy areas, clean every two months. For normal city driving, a quarterly clean works well. Regular cleaning removes dirt and grime before buildup becomes tough. Consistency keeps your engine bay looking fresh and working efficiently.
Preventing Future Build-up
Use protective sprays designed for engine bays. These repel dust and moisture, reducing dirt accumulation. Check for oil leaks regularly and fix them immediately. Cover sensitive electrical parts with plastic wrap during cleaning. Avoid parking under trees to reduce sap and leaf debris. These small steps stop grime from returning quickly.
Safe Practices For Ongoing Care
Always let the engine cool before cleaning. Disconnect the battery to avoid electrical shorts. Use gentle cleaning products made for engines. Avoid high-pressure water sprays that can damage components. Dry the engine bay with a soft cloth or air blower. Follow safety rules to protect your vehicle and yourself.
Conclusion
Cleaning your engine bay does not have to be hard or risky. Follow each step carefully and take your time. Use the right tools and cleaners for best results. Protect sensitive parts from water and chemicals. A clean engine bay looks great and helps spot issues early.
Regular cleaning keeps your engine running smoothly and extends its life. Try this guide and see the difference yourself. Simple, safe, and effective cleaning is within your reach.