Imagine you’re driving through Austin, Texas, and suddenly you hear that dreaded thump-thump-thump—your tire’s gone flat. What do you do next?
If you don’t know how to change a flat tire, you might feel stuck, stressed, or tempted to wait for roadside assistance. But what if you could handle this situation yourself, quickly and confidently? Changing a flat tire is easier than you think, and with the right steps, you can get back on the road in no time.
In this guide, you’ll learn simple, clear instructions to change your flat tire safely—no mechanic needed. Keep reading, and you’ll never fear a flat tire again.
Prepare For Safety
Before you start changing a flat tire, gather all the necessary tools. Having the right tools ready makes the job easier and safer. Each tool plays a key role in the process. Prepare them in advance to avoid delays or frustration.
Spare Tire
The spare tire replaces your flat tire temporarily. Check that it is fully inflated and in good condition. Most cars carry a smaller spare called a “donut.” It is only for short distances and lower speeds. Make sure you know where your spare tire is stored, usually under the trunk floor or beneath the car.
Jack
The jack lifts your car off the ground so you can remove the flat tire. Use the jack that came with your vehicle. Place it under the frame near the tire to avoid damage. Always follow safety instructions for proper use. Never get under the car while it is on the jack.
Lug Wrench
The lug wrench loosens and tightens the lug nuts that hold the tire. It usually has a socket that fits your car’s lug nuts. Use it to turn the nuts counterclockwise to remove them. Keep the nuts in a safe spot during the tire change. Tighten them firmly after installing the spare tire.
Wheel Wedges
Wheel wedges prevent your car from rolling while you change the tire. Place them against the tires opposite to the flat one. Use sturdy objects designed as wheel wedges or large rocks if needed. This simple step adds extra safety and keeps the car stable.
Gather Tools
Loosening the lug nuts is the first key step to remove a flat tire. It helps free the wheel from the hub. This process needs strength and the right technique. Doing it properly saves time and effort later.
Make sure the car is stable before loosening. Use a lug wrench that fits your lug nuts well. This step requires turning the nuts just enough to break their tight hold.
Use Lug Wrench Correctly
Place the lug wrench firmly on a lug nut. Hold the wrench handle with both hands. Apply steady force to avoid slipping. The wrench should fit snugly to prevent damage.
Use your body weight if needed. Push down or pull up smoothly. Avoid jerky or quick moves. This helps prevent injury and protects the nuts.
Turn Counterclockwise
Turn the lug wrench to the left. Left means counterclockwise. This loosens the lug nuts by unscrewing them. Keep turning until the nuts can be moved by hand.
Do not remove the lug nuts completely yet. Just loosen them enough to take off after lifting the car. Turning nuts clockwise will tighten them, so avoid that now.
Loosen Lug Nuts
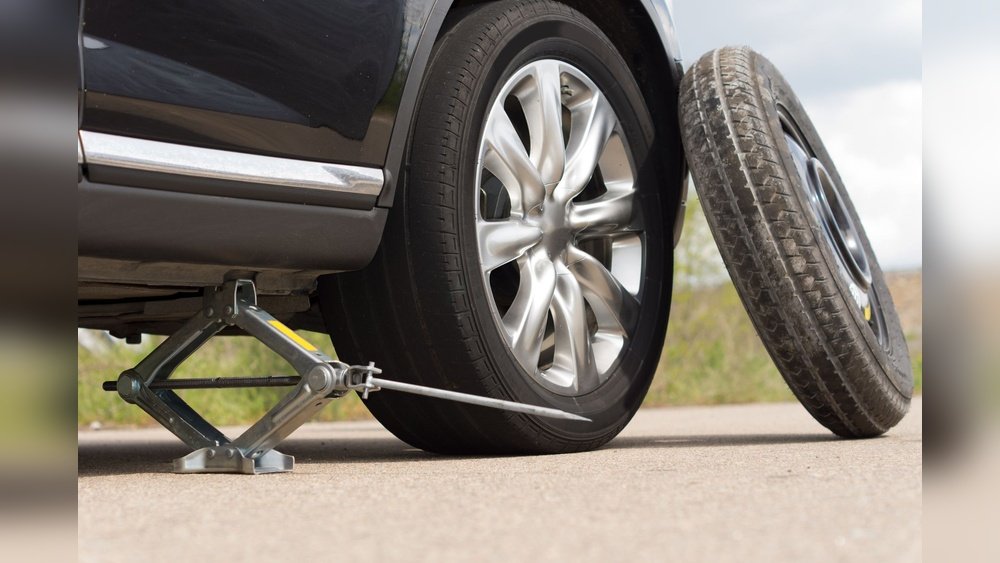
Lifting the vehicle is a key step in changing a flat tire. It lets you remove the damaged tire safely. Use the jack correctly to avoid accidents and damage. Prepare the vehicle by parking on a flat surface and applying the parking brake. This ensures stability while lifting the car.
Position The Jack
Locate the jack point near the flat tire. It is usually marked under the car frame. Place the jack under this solid spot for support. Make sure the jack is on firm, level ground. Avoid soft or uneven surfaces that can cause the jack to slip.
Align the jack so it touches the frame securely. Check that nothing blocks the jack’s path. Position the handle so you can turn it easily. This setup makes lifting safer and smoother.
Raise Until Tire Is Off The Ground
Turn the jack handle slowly to lift the car. Raise the vehicle until the flat tire clears the ground. This gives enough space to remove and replace the tire. Stop lifting if the car feels unstable or the jack shifts.
Keep checking the vehicle’s balance as you raise it. Never place any body parts under the car at this point. Once the tire is off the ground, you can safely remove the lug nuts and take off the flat tire.
Credit: www.aamcoblog.com
Lift The Vehicle
Removing the flat tire is a key step in changing it. This process requires care to avoid damage. Follow clear steps to make removal smooth and safe. Keep tools ready and work on a flat surface for stability.
Unscrew Lug Nuts
Start by loosening the lug nuts with a wrench. Turn them counterclockwise. Do this while the tire is still on the ground. This stops the wheel from spinning. Loosen each nut a little at a time. Don’t remove them fully yet. This keeps the tire stable for the next step.
Pull Tire Straight Off
After loosening lug nuts, lift the car with a jack. Make sure the car is secure before removing the tire. Now, fully unscrew the lug nuts. Keep them in a safe place to avoid loss. Pull the tire straight off the hub. Use both hands for a firm grip. Place the flat tire flat on the ground to prevent rolling.
Remove Flat Tire
Mounting the spare tire is a key step in changing a flat tire. It ensures your vehicle is ready to drive safely. This process requires careful alignment and steady pressure to fit the tire correctly. Follow these steps to mount the spare tire with ease and confidence.
Align Tire With Lug Bolts
Hold the spare tire close to the hub. Line up the holes in the tire with the lug bolts on the wheel hub. Make sure each hole fits perfectly over the bolts. This step helps the tire sit evenly on the wheel hub. Take your time to avoid misalignment or damage.
Push Tire Onto Hub
Once aligned, push the spare tire firmly onto the hub. Apply steady pressure until the tire sits flush against the wheel hub. Avoid forcing or twisting the tire. Proper seating ensures the tire stays secure when tightening the lug nuts. Check that the tire does not wobble or shift.
Mount Spare Tire
Tightening lug nuts correctly is vital for safe driving after changing a flat tire. Proper tightening keeps the wheel securely attached to the vehicle. Loose lug nuts can cause vibrations or even the wheel to come off. Follow these steps carefully to ensure your lug nuts are tight and safe.
Hand Tighten First
Start by screwing the lug nuts onto the wheel by hand. This prevents cross-threading, which can damage the nuts or bolts. Turn each nut clockwise until it feels snug. Avoid using tools at this stage. Hand tightening ensures the nuts sit properly before full tightening.
Lower Vehicle Slightly
Next, lower the vehicle slowly until the tire just touches the ground. This adds resistance to the wheel, stopping it from spinning. Avoid lowering the car completely. The slight weight helps you tighten the lug nuts evenly and safely.
Fully Tighten In Star Pattern
Use a wrench to tighten the lug nuts fully in a star pattern. Tighten one nut, then move to the one directly opposite it. This keeps pressure even on the wheel. Tighten each nut a little at a time. Repeat the pattern until all nuts are firmly secure.
Tighten Lug Nuts
Checking tire pressure is a key step after changing a flat tire. Proper pressure keeps your vehicle safe and stable on the road. Incorrect pressure can cause poor handling and wear out tires faster. Always verify the pressure before driving.
Inflate To Recommended Psi
Find the recommended tire pressure on your vehicle’s door jamb or owner’s manual. Use an air compressor or pump to inflate the tire to this level. Avoid guessing the pressure. Proper inflation helps the tire last longer and improves fuel efficiency.
Use Tire Pressure Gauge
Use a tire pressure gauge to check if your tire is at the correct PSI. Remove the valve cap, press the gauge onto the valve stem firmly, and read the number. Repeat the check a few times for accuracy. This tool is inexpensive and easy to use.
Credit: www.reddit.com
Lower Vehicle
Flat tires can disrupt your day. Temporary repair options help you continue driving safely. These fixes are quick and easy. They allow you to reach a repair shop without trouble. Two popular methods include tire plug kits and sealant with inflator cans. Both can save time and effort.
Using Tire Plug Kits
Tire plug kits fix small punctures in the tread area. Avoid sidewall or shoulder damage repairs with plugs. First, find the leak by inspecting the tire. Use soapy water to spot bubbles showing the hole.
Next, inflate the tire slightly. Remove the object causing the puncture with pliers. Use the reamer tool to clean and widen the hole by twisting it clockwise.
Insert a sticky plug through the insertion tool. Push the plug firmly into the hole. Pull the tool out quickly, leaving the plug inside. Trim any extra plug sticking out.
Inflate the tire to the correct pressure, usually found on the door jamb sticker. Test the repair by spraying soapy water. No bubbles mean the tire is sealed properly.
Sealant And Inflator Cans
Sealant and inflator cans combine air and sealant to fix flat tires temporarily. These cans are easy to use and fast. They work well in emergencies to get you back on the road.
Simply attach the can nozzle to the tire valve. Press the button to inject sealant and air inside the tire. The sealant fills small holes and inflates the tire.
This method is not a permanent fix. It can make future professional repairs more difficult. Avoid using sealant if the damage is on the sidewall or shoulder. Always visit a tire shop soon after using this option.
Check Tire Pressure
Knowing when to call a professional for tire repair is crucial for your safety. Some tire problems need expert attention to avoid accidents or further damage. Recognize these situations early to protect yourself and your vehicle.
Sidewall Damage
Sidewall damage is serious. Cuts, bubbles, or deep cracks on the tire sidewall weaken its structure. These issues cannot be fixed with simple patching or plugging. Driving on a damaged sidewall risks tire blowouts. A professional must inspect and replace the tire if needed.
Uncomfortable With Repair
Changing a tire takes basic tools and skills. Still, not everyone feels safe or confident doing it. If you feel unsure about the process, calling a professional is wise. They have the right tools and experience to handle the job quickly and safely. Your peace of mind matters most.
Highway Or Heavy Traffic Situations
Flat tires on highways or busy roads are dangerous to fix yourself. Traffic speeds and volume increase accident risk. Professionals have training and equipment to work safely in such conditions. They can tow your vehicle or change the tire faster, reducing exposure to danger.

Credit: www.aamcoblog.com
Frequently Asked Questions
Can You Replace A Flat Tire Yourself?
Yes, you can replace a flat tire yourself using a jack, lug wrench, and spare tire. Follow safety steps and instructions carefully.
What Is The 3% Rule For Tires?
The 3% rule for tires means tire diameter should not differ more than 3% from original size. This ensures safe handling and accurate speedometer readings.
Which Side Of A Donut Tire Faces Out?
The side of a donut tire with the label or directional arrows faces outward. This ensures proper fit and safe driving.
Will The Police Help Change A Tire?
Police officers may assist with changing a tire in emergencies, but they often prioritize safety and traffic control. Calling roadside assistance is recommended for tire changes.
Conclusion
Changing a flat tire is a useful skill for every driver. With the right tools, you can fix a flat safely and quickly. Always park in a safe spot before starting. Follow each step carefully to avoid mistakes. Practice this process at home to build confidence.
Remember, some tire damage needs professional help. Stay calm and prepared to handle flat tires on the road. This simple knowledge can save time and money. Keep your spare tire and tools ready for emergencies. Driving with confidence starts with knowing how to change a tire.