Is your car’s battery warning light on? Or maybe your headlights are flickering unexpectedly?
These could be signs that your alternator isn’t doing its job properly. But before rushing to the mechanic, you can quickly check your alternator’s health yourself—with just a simple tool you might already have: a multimeter. Testing an alternator with a multimeter is easier than you think, and knowing how to do it can save you time, money, and hassle.
In this guide, you’ll learn clear, step-by-step instructions to test your alternator and understand what the readings mean. Keep reading to take control of your car’s electrical system and avoid getting stranded unexpectedly.
Tools Needed
Testing an alternator with a multimeter needs the right tools. Having these tools ensures accurate and safe testing. Prepare your workspace and gather the necessary items first.
Using proper tools helps you find alternator problems quickly. It also prevents damage to your vehicle’s electrical system.
Multimeter
A multimeter is the main tool for this test. Choose a digital multimeter with voltage and continuity settings. It measures voltage output and helps check the alternator’s function.
Safety Gloves
Wear safety gloves to protect your hands. They guard against electrical shocks and sharp engine parts. Safety is important when working near moving parts.
Protective Eyewear
Protective eyewear shields your eyes from sparks or debris. It keeps you safe from unexpected engine splashes or flying particles.
Vehicle Owner’s Manual
The owner’s manual provides specific information about your car’s electrical system. It helps locate the battery and alternator terminals for testing. Follow manual instructions carefully.
Battery Terminal Cleaner
Clean battery terminals ensure good contact during testing. Use a terminal cleaner or wire brush to remove corrosion. This step improves test accuracy.
Flashlight
A flashlight helps you see clearly under the hood. It is useful in low light or tight spaces. Good visibility makes the testing process easier and safer.
Prepare The Vehicle
Before testing the alternator with a multimeter, prepare the vehicle properly. This step ensures accurate and safe readings. Take a moment to get everything ready. Follow each instruction carefully for the best results.
Locate The Battery
Open the vehicle’s hood and find the battery. It usually sits near the front of the engine bay. Look for a rectangular box with two cables attached. The battery terminals have a plus (+) and minus (-) sign. Identify the positive terminal with a red cover or cable. The negative terminal is often black or marked with a minus sign. Knowing these points is crucial for connecting the multimeter correctly.
Set Multimeter To Voltage
Turn on your multimeter and set it to measure voltage. Use the DC voltage setting, often marked as “V” with straight lines. Choose a range above 20 volts to cover the car battery’s voltage. This setting helps to read the battery and alternator output accurately. Make sure the multimeter leads are ready for use. The red lead connects to the positive terminal, and the black lead connects to the negative terminal.
Check Battery Voltage
Start by connecting the multimeter probes to the battery terminals to measure voltage. Check the reading with the engine off and then running to spot any issues. This helps identify if the alternator is charging the battery properly.
Connect Multimeter Probes
First, turn off the car engine. Set your multimeter to the DC voltage setting.
Connect the red probe to the positive (+) battery terminal. Attach the black probe to the negative (-) terminal.
Make sure the probes touch the metal parts of the terminals well. This ensures an accurate reading.
Read Battery Voltage
Look at the multimeter display. A healthy battery shows around 12.6 volts when the engine is off.
If the voltage is below 12.4 volts, the battery might be weak or discharged.
Next, start the engine and check the voltage again. It should rise to about 13.7 to 14.7 volts.
This increase means the alternator is charging the battery properly.
If the voltage stays the same or drops, the alternator may be failing.

Credit: tameson.com
Test Alternator Output
Testing the alternator output with a multimeter helps check its charging ability. This test shows if the alternator sends enough power to the battery and electrical system. It is a simple step to find charging problems early.
Use a digital multimeter set to measure voltage. The battery terminals are the points to check. Follow these steps carefully to get accurate results.
Start The Engine
First, start the car engine. Let it run at idle speed for about one minute. The alternator must be active to test its output. Keep all accessories like headlights and radio off at this point to get a clear reading.
Measure Voltage At Battery Terminals
Set the multimeter to DC voltage mode, usually 20 volts range. Connect the red probe to the positive battery terminal. Connect the black probe to the negative terminal. Read the voltage on the multimeter display carefully.
Next, turn on electrical loads such as headlights and the radio. Check the voltage again. This shows how the alternator performs under normal use.
Interpret Voltage Readings
Voltage between 13.8 and 14.5 volts means the alternator is working well. Readings below 13.8 volts indicate the alternator might not charge the battery properly. If voltage is above 14.8 volts, the alternator may overcharge and damage the battery.
Compare readings with the engine off, which should be around 12.6 volts. This helps confirm if the alternator changes voltage as expected when running.
Perform Voltage Drop Test
The voltage drop test helps check the alternator’s output under load. It shows if the alternator delivers stable voltage to the battery. This test reveals wiring or connection issues that affect charging. Using a multimeter, you can measure voltage loss across key points in the charging circuit. Follow these steps carefully for accurate results.
Connect Probes For Voltage Drop
Set your multimeter to the DC voltage setting. Attach the red probe to the positive (+) battery terminal. Connect the black probe to the alternator’s output terminal or the battery cable end near the alternator. Ensure probes make firm contact with clean metal surfaces. Loose or dirty connections cause false readings.
Start Engine And Observe Readings
Start the engine and let it run at idle. Watch the multimeter display carefully. The voltage should stay steady between 13.8 and 14.5 volts. Turn on electrical loads like headlights, radio, and fan. Observe any voltage changes during this time. Voltage should not drop significantly when loads increase.
Analyze Results
A voltage drop under 0.2 volts is normal. Higher drops indicate resistance in wiring or poor connections. If voltage falls below 13 volts, the alternator may be weak or failing. Voltage above 15 volts suggests an overcharging alternator, which can damage the battery. Use these readings to decide if repair or replacement is needed.
Test Under Load
Testing an alternator under load is crucial for accurate results. It shows how the alternator performs when your car uses its electrical systems. This test helps find problems not visible in no-load conditions. Follow simple steps to check your alternator’s true condition.
Turn On Electrical Accessories
Start your car and keep the engine running. Switch on accessories like headlights, radio, and air conditioning. These devices create a load on the alternator. It forces the alternator to work harder and produce real output. This step simulates normal driving conditions.
Measure Voltage With Load
Use your multimeter to measure voltage at the battery terminals. Place the red probe on the positive terminal and the black probe on the negative. With accessories on, the voltage should stay between 13.5 and 14.5 volts. A lower reading suggests the alternator cannot keep up with the demand.
Evaluate Alternator Performance
Analyze the voltage readings carefully. A stable voltage means the alternator is working well. If voltage drops below 13 volts, it may be weak or failing. Voltage above 15 volts signals overcharging, which can harm the battery. This test confirms if your alternator needs repair or replacement.
Identify Common Issues
Identifying common issues with your alternator helps avoid bigger car problems. A multimeter test reveals if your alternator works correctly. It also shows if it undercharges or overcharges the battery. Knowing these signs saves time and money on repairs.
Signs Of Undercharging
Undercharging means the alternator does not produce enough voltage. Your battery voltage will be below 13.5 volts while the engine runs. You may notice dim headlights or slow electrical accessories. The battery may lose power quickly and cause starting problems. A multimeter reading below 13.5 volts signals undercharging.
Signs Of Overcharging
Overcharging occurs when the alternator produces too much voltage. Voltage readings above 14.8 volts can damage the battery and electronics. You may see a burning smell or hear a whining noise from the alternator. Overcharging can cause battery fluid to boil and leak. Use a multimeter to detect voltage above the normal range.
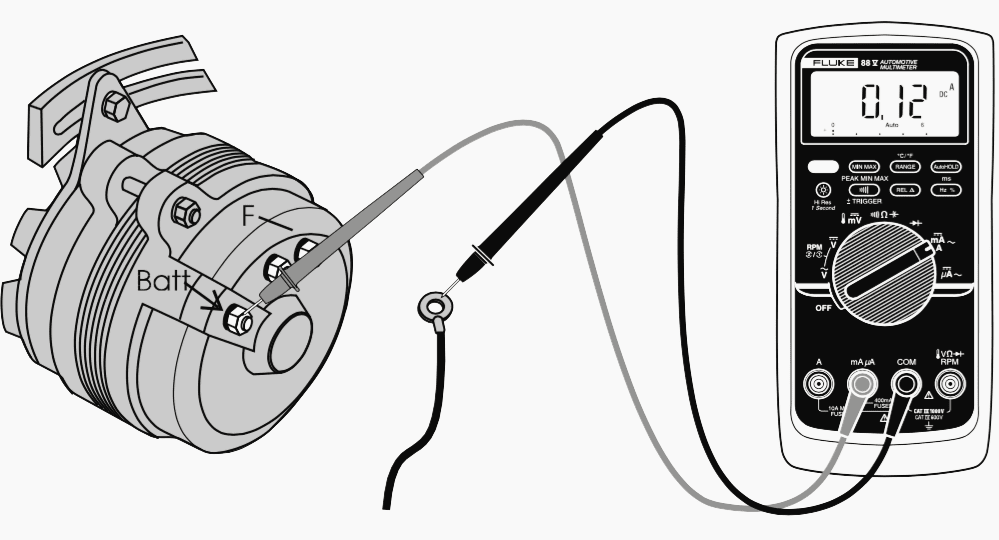
Battery Vs Alternator Problems
Battery and alternator issues can look similar but have different causes. A dead battery may not hold charge even if the alternator works. An alternator problem means the battery will drain despite being good. Test the battery voltage with the engine off first. Then, test again with the engine running to check the alternator output. This helps tell if the battery or alternator needs fixing.

Credit: www.fluke.com
Safety Tips
Always wear safety gloves and eye protection before testing an alternator. Avoid touching moving engine parts or hot surfaces during the process. Ensure the car is off when connecting the multimeter probes to prevent electric shock.
Wear Protective Gear
Always wear safety glasses to protect your eyes. Gloves help prevent electric shocks and cuts. Avoid loose clothing that can catch on car parts.
Work In A Well-ventilated Area
Test the alternator outdoors or in a garage with open doors. Car batteries release harmful gases. Fresh air reduces the risk of inhaling these fumes.
Turn Off The Engine Before Connecting
Switch off the engine before attaching the multimeter. This prevents sparks and short circuits. Secure the vehicle with the parking brake.
Use The Correct Multimeter Settings
Set the multimeter to measure voltage or resistance as needed. Wrong settings can damage the tool or cause false readings. Double-check before testing.
Handle Battery Terminals Carefully
Connect the red probe to the positive terminal, black to negative. Avoid touching both probes together during testing. This prevents sparks and short circuits.
Avoid Metal Jewelry
Remove rings, watches, and bracelets before starting. Metal can cause shorts or electric shocks. Keep tools and parts away from battery terminals.
Keep Children And Pets Away
Ensure children and pets stay clear of the testing area. They can distract or accidentally touch hazardous parts. Safety for all is important.
Credit: electrical-engineering-portal.com
Frequently Asked Questions
How Do You Test If An Alternator Is Bad With A Multimeter?
Set multimeter to DC volts. Connect red probe to battery positive, black to negative. Start engine, check voltage; 13. 8-14. 4V means good alternator. Below 13. 8V indicates undercharging; above 14. 4V shows overcharging. Turn on accessories; voltage should remain stable.
Unstable readings suggest a bad alternator.
What Voltage Should A Good Alternator Read?
A good alternator should read between 13. 8 and 14. 4 volts with the engine running. This ensures proper battery charging.
How To Tell If An Alternator Or Battery Is Bad?
A bad battery causes slow or no engine cranking and power loss. A bad alternator lets the car start but dies soon after. Test battery voltage with a multimeter; it should read around 12. 6V off and 13. 7-14. 7V running for a good alternator.
How To Check Alternator Easy Way?
Use a multimeter set to DC volts. Connect red to positive and black to negative battery terminals. Start the engine and check voltage. A good alternator reads between 13. 8 and 14. 4 volts. Turn on accessories; voltage should stay stable.
Lower or fluctuating voltage indicates alternator issues.
Conclusion
Testing an alternator with a multimeter is simple and effective. Start by measuring battery voltage with the engine off. Then, check voltage again with the engine running. A healthy alternator usually shows 13. 8 to 14. 4 volts. Watch for readings below or above this range.
Turn on electrical loads like headlights to test under stress. Consistent voltage means the alternator works well. Low or fluctuating voltage signals a problem. Regular testing helps avoid unexpected car breakdowns. Use your multimeter carefully and follow safety steps. This quick check saves time and money on repairs.