If you’re looking to tint your Tesla Model 3, you’ve come to the right place. Tinting your car windows isn’t just about style—it protects your interior, reduces glare, and keeps your cabin cooler during those hot Texas summers.
But Tesla’s sleek design and frameless windows can make tinting a bit tricky if you’re new to it. Don’t worry—this guide will walk you through the simple steps and insider tips you need to get a flawless tint job, whether you decide to do it yourself or want to understand the process before visiting a pro.
Ready to upgrade your ride and enjoy the benefits of tinted windows? Let’s dive in!

Credit: twraps.com
Benefits Of Tinting Tesla Model 3
Tinting a Tesla Model 3 offers many advantages beyond its sleek look. It improves comfort, protects the interior, and adds privacy. Each benefit helps enhance your driving experience and keeps your car in great shape.
Heat Reduction And Uv Protection
Tinted windows block much of the sun’s heat. This helps keep the cabin cooler on hot days. It reduces the need for air conditioning, saving energy and battery life.
UV rays cause skin damage and fade interiors. Tinting filters out most harmful UV rays. This protects your skin and keeps seats and dashboard from cracking or fading.
Enhanced Privacy And Style
Darkened windows shield passengers and belongings from outside view. This adds a layer of privacy for you and your passengers.
Tinting also gives the Model 3 a more stylish, finished look. It can match the car’s design and make it stand out on the road.
Interior Preservation
Sunlight can damage upholstery, plastics, and electronics over time. Tinting slows this damage by reducing exposure to sunlight.
It helps maintain the car’s interior quality and resale value. A well-preserved interior stays attractive and comfortable longer.

Credit: www.youtube.com
Choosing The Right Tint Film
Choosing the right tint film for your Tesla Model 3 is crucial. The correct tint improves comfort, privacy, and protects your interior. It also enhances the car’s appearance while reducing glare and heat. Not all tint films suit every need or location. Understanding types, legal limits, and recommended shades helps you pick the best option.
Types Of Window Tint Films
There are several types of tint films available. Dyed film is affordable and blocks sunlight by absorbing it. Metalized film has tiny metal particles that reflect heat and UV rays. Ceramic film offers high heat rejection without blocking signals. Hybrid films combine dyed and metalized layers for balanced performance. Each type varies in cost, durability, and heat protection.
Legal Tint Limits In Austin, Texas
Austin, Texas has strict rules for window tinting. Front side windows must allow more than 25% light in. Rear side and back windows can have darker tints. Windshield tint is limited to the top few inches only. Following local laws avoids fines and safety issues. Always check the latest Texas tint laws before tinting your Tesla Model 3.
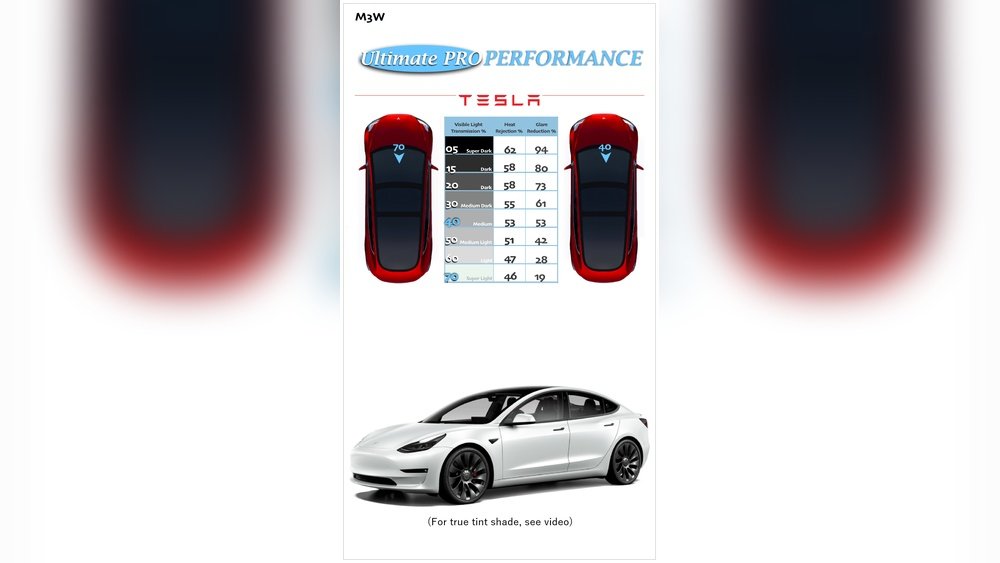
Recommended Shades For Tesla Model 3
Popular shade choices depend on your needs and local laws. For front windows, 35% to 50% Visible Light Transmission (VLT) balances privacy and visibility. Rear windows often use 20% to 35% VLT for extra privacy. Darker tints help block heat and UV rays, protecting your Tesla’s interior. Choose shades that complement the car’s sleek design and match legal limits.
Tools And Materials Needed
Tinting a Tesla Model 3 requires the right tools and materials. Proper preparation helps achieve a smooth, bubble-free finish. Choosing the correct film and having the right equipment makes the job easier and faster. This section covers everything needed for a successful tint installation.
Precut Tint Kits Vs. Diy Film Rolls
Precut tint kits come with pieces shaped to fit Tesla Model 3 windows. They save time and reduce cutting errors. DIY film rolls offer more flexibility and lower cost. However, cutting and fitting require more skill and patience. Both options work well if chosen carefully.
Essential Tools For Installation
A squeegee helps remove air bubbles and smooth the film. A sharp utility knife is necessary for trimming excess tint. A spray bottle with water and a few drops of soap aids in positioning the film. A heat gun or hairdryer softens the film for bending around curves. Having a ruler or measuring tape ensures precise cuts.
Cleaning Supplies And Protective Gear
Clean windows are key to avoiding dust and debris under the tint. Use glass cleaner and lint-free cloths for a spotless surface. Protective gloves keep fingerprints off the film and protect hands. A microfiber towel helps dry windows without scratching. Dust-free conditions improve the final result.
Credit: www.reddit.com
Preparing Tesla Model 3 For Tinting
Preparing your Tesla Model 3 for tinting is a vital step to get the best results. Clean and ready windows help the tint film stick properly. Protecting the car’s sensitive electronics and interior ensures no damage happens during the process. Adjusting the window positions correctly makes applying the tint easier and more precise. These steps make the tinting job smoother and longer-lasting.
Cleaning Exterior And Interior Windows
Start by washing the outside of all windows with a gentle glass cleaner. Dirt and grease can cause bubbles under the tint. After drying, clean the inside surfaces carefully. Use a lint-free cloth to avoid leaving fibers. A clean surface ensures strong adhesion and a clear finish.
Protecting Door Electronics And Interior
The Model 3 has sensitive door electronics that need protection. Cover the door panels with plastic sheets or cloths to guard against water or cleaning sprays. Avoid spraying liquids directly near buttons or speakers. Taking these precautions prevents costly electrical damage during tinting.
Adjusting Window Positions
Fully raise all windows before starting the tinting process. For frameless side windows, keep the door slightly open and use a tool to hold the window up. This helps tuck the tint film under weather stripping neatly. Proper window positioning allows a smooth, wrinkle-free tint application.
Tinting Rear Window
The rear window of the Tesla Model 3 has a unique shape. Tinting it requires care and precision. Proper tinting improves privacy and reduces heat inside the car. It also protects the interior from harmful UV rays.
The rear window uses a single large piece of film. This film must be cut and applied perfectly. Small mistakes can cause bubbles or wrinkles. Understanding the right techniques helps achieve a smooth finish.
Applying One-piece Film
Start by cleaning the rear window thoroughly. Remove all dust and dirt. Cut the tint film to fit the window size. Lay the film gently on the glass. Use a squeegee to press the film flat. Work from the center out to the edges. This removes trapped air and water.
Using Pull Shrink Technique
The rear window has strong curves that need special handling. Use a heat gun to warm the film lightly. Pull the film horizontally while heating it. This helps the film shrink and fit the glass shape. Move slowly to avoid stretching or tearing. Continue until the film fits snugly.
Handling Intense Curves
Tesla’s rear window curves sharply near the edges. Use a soft plastic tool to smooth the film into these curves. Avoid sharp tools that can damage the film. Work patiently and stretch the film only where needed. Proper handling prevents creases and bubbles in tight areas.
Tinting Frameless Side Windows
Tinting frameless side windows on a Tesla Model 3 requires special care. These windows do not have the usual frame, making the tinting process more delicate. Proper technique ensures the film fits well and looks smooth. A neat finish improves the car’s style and protects from sun glare. Follow key steps to tint these windows correctly and avoid damage.
Bottom Loading Method
Start by lowering the frameless window slightly. Use a tool to hold the door latch open. This keeps the window raised just enough for work. Carefully slide the tint film from the bottom edge. Avoid folding or creasing the film during placement. This method helps access the entire glass surface safely. It allows precise alignment of the tint with the window shape.
Tucking Film Behind Weather Stripping
Once the film is in place, gently lift the weather stripping. Tuck the film edge underneath this rubber seal. Use a soft plastic tool to push the film evenly. This hides the film edges and stops peeling. The weather stripping holds the tint firmly against the glass. It also prevents dust and moisture from entering under the film.
Ensuring Seamless Finish
Smooth out all bubbles and wrinkles using a squeegee. Work from the center outwards to push air out. Trim any excess film carefully along window edges. Check for gaps between the film and weather stripping. Ensure the tint lies flat and tight on the glass. A seamless finish offers a clean look and long-lasting protection. Proper sealing extends the tint’s life and keeps the interior cooler.
Tips For Smooth Film Application
Applying window tint film to your Tesla Model 3 requires care and precision. Smooth application ensures a clean, professional look. It also helps the film last longer without peeling or bubbling. Follow these practical tips to achieve a flawless finish.
Avoiding Creases And Bubbles
Start by applying the film slowly and evenly. Use a soft squeegee to press the film onto the glass. Work from the center outward to push out air pockets. Avoid stretching the film too much; this causes wrinkles. If bubbles appear, gently lift the film and reapply. Small bubbles often disappear after a few days as the film settles.
Proper Use Of Heat Gun
Heat helps the film conform to curved surfaces. Use a heat gun on low to medium settings. Keep the gun moving to avoid overheating any spot. Heat softens the film, making it easier to shape. Hold the film taut while applying heat. This prevents creases and helps the adhesive bond better.
Maintaining Clean Environment
Work in a dust-free area to keep the film clean. Even tiny dust particles cause bumps under the film. Clean the glass thoroughly before starting. Use a lint-free cloth and a good window cleaner. Avoid windy or humid places. Close doors and windows to reduce airborne dust during application.
Common Mistakes To Avoid
Tinting a Tesla Model 3 can improve comfort and privacy. Avoid mistakes that cause damage or reduce tint quality. These errors often lead to costly fixes or poor results. Learn what to watch for to keep your tint job smooth and effective.
Overheating Tint Film
Applying too much heat can damage the tint film. Keep the heat gun moving steadily to avoid hot spots. Overheating can cause bubbles, wrinkles, or peeling. Use moderate heat to shrink the film evenly over curves. Work slowly and with care to protect the film’s integrity.
Water Damage To Electronics
Tesla Model 3 has many sensitive electronics inside doors. Avoid spraying water near electronic parts during cleaning or tinting. Water can cause short circuits or corrosion in these components. Protect the door panels by covering or sealing areas around electronics. Use minimal water and dry surfaces quickly to prevent damage.
Incomplete Shrinking Of Film
The rear window of the Model 3 has a strong curve. Tint film shrinks only in one direction, so proper shrinking is key. Failing to shrink the film fully causes wrinkles and poor adhesion. Use a pull-shrink method with a heat gun to fit the film perfectly. Take your time to ensure a smooth, bubble-free finish.
Post-installation Care
After tinting your Tesla Model 3, proper care helps protect the film and keep it looking new. Post-installation care is crucial to avoid damage and ensure the tint lasts longer. Follow these simple steps for the best results.
Drying Time And Window Usage
Allow the tint film to dry completely before rolling down windows. This drying process usually takes about 3 to 5 days. Avoid opening or closing windows during this time to prevent peeling or bubbling. Keep your car parked in a shaded area to help the drying process.
Cleaning Tinted Windows
Use a soft cloth and mild, ammonia-free cleaner to clean tinted windows. Harsh chemicals can damage the tint film. Gently wipe the glass in a circular motion to remove dirt and smudges. Avoid using abrasive materials or scrapers that can scratch the tint.
Maintaining Tint Longevity
Protect your tint by parking in shaded or covered areas. Avoid exposing windows to extreme heat or direct sunlight for long periods. Regularly check for signs of peeling or bubbling. Address small issues quickly to prevent further damage. Proper care helps keep your Tesla’s tint clear and effective for years.
Diy Vs. Professional Tinting
Tinting a Tesla Model 3 offers privacy, heat reduction, and style. Choosing between DIY and professional tinting can be tough. Both options have benefits and drawbacks. Understanding these helps make the best choice for your needs.
Cost Comparison
DIY tint kits cost less upfront. You pay mainly for the film and tools. Professional tinting costs more because of labor and expertise. Prices vary from $150 to $400 depending on the tint quality and shop.
DIY saves money but risks wasting film if mistakes happen. Professionals deliver a clean finish without extra costs from errors.
Skill And Precision Differences
Tesla Model 3 windows have curves that challenge beginners. DIY requires patience and steady hands to avoid bubbles or creases. Professionals use special tools and training to fit the film perfectly.
Precision is key for long-lasting tint without peeling. Professional installers ensure a smooth, flawless look that lasts years.
When To Seek Professional Help
Choose professionals if you want guaranteed quality and durability. Complex rear windows and frameless side windows need expert handling. Professionals also fix any issues quickly during installation.
Seek help if you lack experience or tools. Professional tinting saves time and reduces stress, especially for first-timers.
Frequently Asked Questions
Can I Tint My Tesla Model 3?
Yes, you can tint your Tesla Model 3. Professional tinting ensures precise fit and avoids bubbles. DIY tinting requires skill due to curved windows. Use precut kits for easier installation and protect interior electronics during the process. Tinting improves privacy, reduces glare, and blocks heat effectively.
Can I Tint My Own Tesla?
You can tint your own Tesla using DIY kits, but it requires skill to handle curves and avoid bubbles or creases. Professional tinting ensures precise, clean results. Precut kits help beginners, but protecting electronics and cleaning thoroughly is essential during installation.
How Much Does It Cost To Tint A Tesla Model 3?
Tinting a Tesla Model 3 typically costs between $200 and $500, depending on tint quality and installer location.
How Long Does It Take To Tint A Tesla Model 3?
Tinting a Tesla Model 3 typically takes 1 to 2 hours. This includes cleaning, film application, and curing. Professional installers ensure precise fitting on curved windows for a smooth finish.
Conclusion
Tinting your Tesla Model 3 enhances comfort and protects from sunlight. Take time to clean windows well before applying tint. Use proper tools and techniques to avoid bubbles or creases. Be careful around electronics and sensitive parts during installation. Patience and attention lead to a smooth, professional look.
Whether DIY or professional, quality matters for lasting results. Enjoy your cooler, more private Tesla rides every day.