Thinking about giving your car a sleek new look while cutting down on heat and glare? You might be surprised to learn that you can install your own auto tint right at home.
Yes, you! With the right tools, patience, and a clean space, DIY window tinting is within your reach—and it can save you money while giving you a real sense of accomplishment. But before you dive in, it’s important to know the secrets to getting a smooth, bubble-free finish and how to avoid common pitfalls.
Ready to take control and transform your ride with your own hands? Keep reading, because we’re breaking down everything you need to know to DIY install your auto tint like a pro.

Credit: www.montesol.com.uy
Benefits Of Diy Auto Tint
Installing auto tint by yourself brings many benefits. It saves money and offers a rewarding experience. You get to control every step and choose the film you want. This section explains the main advantages of DIY auto tint.
Cost Savings
DIY auto tinting cuts out labor fees. Professional tinting can be costly. Doing it yourself lowers the total expense. You only pay for the tint film and tools. This makes tinting your car more affordable.
Personal Satisfaction
Applying tint yourself feels rewarding. Completing the task builds confidence and pride. You learn new skills and improve patience. Watching your work on the car brings joy. It is a great way to spend time on your vehicle.
Full Control Over Process
DIY lets you pick the film type and shade. You decide the tint darkness and style. You work at your own pace without pressure. Mistakes can be fixed right away. This control helps achieve the exact look you want.

Credit: www.amazon.com
Challenges Of Tinting Yourself
Tinting your car windows yourself can be tempting. It saves money and gives a sense of pride. Yet, DIY tinting has many challenges. These can affect the final look and durability of the tint. Understanding these hurdles helps prepare you for a smoother process.
Dust And Cleanliness Issues
Dust is the biggest enemy of window tinting. Even small dust particles stick under the film. This causes bubbles and spots that ruin the finish. Tinting needs a very clean, dust-free space. A garage or indoor area works best. Wiping windows carefully before applying is also critical.
Skill And Patience Requirements
Applying tint film demands steady hands and patience. The film is delicate and can tear easily. It takes practice to place it smoothly. Mistakes often mean starting over. Rushing leads to wrinkles and air pockets. Patience is key to get a neat result.
Film Quality Limitations
High-quality tint films are usually sold to professionals. DIY films can be cheaper but may fade or turn purple. Low-quality film reduces heat protection and durability. Choosing the right film affects how long the tint lasts. Investing in a good film pays off in the end.
Legal Tinting Regulations
Each state has rules about how dark tint can be. Austin, Texas, has specific limits for different windows. Illegal tint can lead to fines and having to remove the film. Knowing and following local laws is essential. Check regulations before starting your project.
Tool And Space Needs
Proper tools make tinting easier and cleaner. You need a squeegee, sharp blade, spray bottle, and heat gun. A large, clean workspace helps avoid dust and damage. Lack of space or tools increases the risk of errors. Prepare all materials and find a good place before you begin.
Choosing The Right Film
Choosing the right window tint film is crucial for a successful DIY auto tint project. The film you pick affects the look, durability, and legal compliance of your tint. This section explains different types of films, compares professional and DIY options, and explores color and darkness choices. Understanding these factors helps you make the best decision for your vehicle.
Types Of Window Tint Films
There are several types of window tint films available. Dyed films block sunlight by absorbing it, giving a dark appearance. Metalized films use tiny metal particles to reflect heat and UV rays. Ceramic films offer the best heat rejection and clarity without signal interference. Each type has unique benefits depending on your needs and budget.
Professional Vs Diy Grade Films
Professional-grade films usually have better materials and longer warranties. They resist fading and bubbling over time. DIY-grade films are cheaper and easier to install but may not last as long. They can be less clear and prone to peeling. Choose professional-grade for quality and durability. Pick DIY-grade if you want to save money and don’t mind reapplying later.
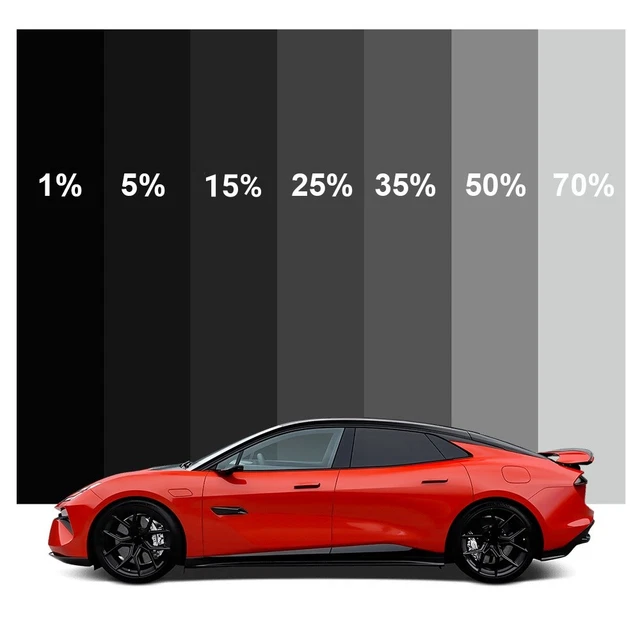
Color And Darkness Options
Window tint comes in many colors and shades. Most people choose black or gray for a sleek look. Some films add a slight mirror effect for extra privacy. Darkness levels vary from light to very dark. Check your local laws to see the legal limits on tint darkness. Pick a shade that balances privacy, heat reduction, and visibility for safe driving.
Preparing For Installation
Preparing your vehicle for auto tint installation sets the stage for a smooth process. This step helps avoid common mistakes that can ruin your tint film. Taking time to prepare will improve the finish and durability of the tint.
Preparation starts with making sure your windows are spotless. Dust and dirt cause bubbles and uneven spots under the film. Next, create a clean workspace free of dust and wind. Finally, gather all the tools you need before you begin. These actions save time and reduce frustration during installation.
Cleaning Windows Thoroughly
Use a good glass cleaner and a microfiber cloth. Spray the cleaner on the window and wipe off all dirt and grease. Pay special attention to the edges and corners. Remove any stickers or debris stuck on the glass. A clean surface ensures the tint film sticks well and looks smooth.
Setting Up A Dust-free Workspace
Choose a garage or an indoor space with no wind or dust. Close all doors and windows to keep the air still. Turn off fans and air conditioners that blow dust around. Dust particles can get trapped under the tint and cause bubbles. A calm, clean environment is key to a good tint job.
Gathering Necessary Tools
Collect all items before starting to avoid interruptions. You will need a squeegee, sharp utility knife, spray bottle with soap and water, and a heat gun or hair dryer. Have a clean cloth and a lint-free towel handy. Having the right tools ready helps make the installation quick and efficient.
Cutting And Measuring Film
Cutting and measuring the tint film is a crucial step in your DIY auto tint project. Accurate measurements ensure the film fits the window perfectly. A well-cut film prevents bubbles and wrinkles, giving your car a smooth, professional look.
Taking your time during this step can save you from having to redo the work. Use precise tools and follow the window’s shape carefully. This section guides you through measuring, cutting, and shaping the film for curved windows.
Measuring Window Dimensions
Start by cleaning the window. Use a tape measure to get the width and height. Measure the window from edge to edge.
Write down the exact numbers. Double-check to avoid mistakes. Accurate measurements reduce wasted film and improve fit.
Cutting Oversized Film
Cut the film slightly larger than the measurements. Leave an extra half inch on each side. This extra space helps during installation.
Use a sharp utility knife or scissors for clean cuts. Cut on a flat surface to keep edges straight. Avoid jagged or uneven lines for best results.
Shaping For Curved Windows
Curved windows need special attention. Place the film on the window to check the fit. Trim the film little by little to follow curves.
Use a heat gun or hair dryer to soften the film. This makes it easier to shape and stick to curves. Work slowly to avoid wrinkles or bubbles.
Applying The Tint Film
Applying the tint film is a key step in your DIY auto tint project. It needs focus and a clean workspace. The film must stick smoothly to the glass for the best look and protection. Follow each step carefully to avoid wrinkles and bubbles. This process can be simple with the right method and tools.
Spraying Solution On Glass
Start by spraying the glass with a special solution. This liquid helps the tint film slide into place. Cover the entire window evenly. The solution also prevents the film from sticking too soon. It makes adjustments easier.
Peeling Film Liner Carefully
Next, peel off the protective liner from the tint film. Do this slowly to avoid tearing. Hold the film by the edges to keep it clean. Make sure no dust or dirt touches the sticky side.
Positioning Film On Window
Place the film onto the wet glass. Align it with the window edges carefully. The solution allows you to move the film slightly. Adjust until it fits perfectly without folds or wrinkles.
Removing Bubbles And Water
Use a squeegee to push out bubbles and water. Start from the center and move toward the edges. Work gently but firmly to smooth the film. Check for trapped air and liquid. Repeat until the surface is flat and clear.
Trimming And Finishing
Trimming and finishing are crucial steps in your DIY auto tint installation. These steps ensure the tint fits perfectly and looks professional. Precise trimming prevents peeling and bubbling later. Careful finishing gives a clean, sleek appearance to your windows.
Using Sharp Blades Safely
Always use a new, sharp blade for trimming. Dull blades cause uneven cuts and damage the film. Hold the blade firmly but gently to avoid slipping. Cut away from your body and fingers to prevent injuries. Change blades often to keep the cuts smooth and clean.
Trimming Excess Film
Start trimming from the edges of the window. Follow the window’s shape closely for a tight fit. Use slow, steady strokes for a clean line. Leave a tiny gap between the film edge and the rubber seal. This gap prevents the film from peeling off over time.
Final Inspection For Imperfections
Check the window carefully for bubbles or wrinkles. Use a soft squeegee to smooth out small bubbles gently. Look for any dust or dirt trapped under the film. Remove any debris carefully with a small pin or blade. A flawless finish improves the tint’s durability and appearance.
Common Mistakes To Avoid
Applying tint to your car windows yourself can be rewarding. Avoid common mistakes to ensure a smooth, clean finish. Many beginners rush or overlook key steps. These errors can ruin the tint and waste your time and money.
Careful preparation and patience lead to better results. Understanding the pitfalls helps you prevent costly errors. Focus on each step and avoid these common mistakes.
Rushing The Process
Taking your time is crucial when installing auto tint. Rushing causes bubbles, wrinkles, and uneven application. Let the film settle and dry properly. Patience improves the overall look and durability of the tint.
Ignoring Dust And Debris
Small dust particles ruin the tint finish. Clean your workspace and windows thoroughly before starting. Even tiny debris trapped under the film causes bumps and bubbles. Work in a dust-free environment for best results.
Using Low-quality Films
Cheap tint films often fade or turn purple quickly. Low-quality films may peel or crack sooner. Invest in good-quality tint for long-lasting results. Quality film also provides better UV protection and heat rejection.
Incorrect Cutting And Trimming
Cutting the tint film too large or small leads to poor fit. Sharp blades and steady hands are necessary for precise cuts. Trim slowly and carefully around window edges. Proper trimming prevents peeling and gaps in the tint.
When To Hire A Professional
Knowing when to hire a professional for auto tint installation can save you time and avoid costly mistakes. Some situations require expert skills and experience that go beyond basic DIY efforts. Professionals provide benefits that DIY kits cannot match.
Complex Window Shapes
Windows with curves or unusual shapes need precise cutting and fitting. DIY tint kits may not fit well on these windows. Professionals use special tools and techniques to handle complex shapes. This ensures a smooth finish without bubbles or creases.
Need For Warranty And Durability
Professional tint services often include a warranty on materials and work. This protects you if the tint peels or fades early. DIY tint films may not last as long or perform as well. Hiring a pro guarantees better quality and longer-lasting results.
Time Constraints
Tinting car windows can take several hours for beginners. Professionals complete the job faster due to experience. If you need your car ready quickly, hiring a pro saves time. It also reduces stress by avoiding trial and error during installation.
Credit: naraithaispa.com
Frequently Asked Questions
Can You Put Tints On Your Car Yourself?
Yes, you can tint your car windows yourself. It saves money but needs patience, a clean space, and proper tools. DIY results may lack professional quality and warranties. Professionals offer faster, high-quality finishes and legal compliance. Choose DIY only if detail-oriented and ready for a learning curve.
Is 5% Tint Legal In Hawaii?
No, 5% tint is illegal in Hawaii. Front side windows must allow over 70% light transmission by law.
Is It Cheaper To Do Tint Yourself?
Tinting your car yourself can save money by avoiding labor costs. It requires patience, a clean space, and proper tools. DIY may result in imperfections and longer time. Professionals offer quality, speed, and warranties. Choose DIY only if you seek savings and accept potential challenges.
Why Do Cops Care So Much About Tint?
Cops care about tint because it affects visibility inside vehicles. Dark tint can hide illegal activities or weapons. It also ensures drivers have clear sight, promoting road safety. Law enforcement enforces tint laws to prevent accidents and maintain security.
Conclusion
DIY auto tint installation can save money and bring pride. Clean your workspace well to avoid dust and mistakes. Take your time and follow each step carefully. Choose good quality film that meets local laws. Practice patience—it may take a few tries to get it right.
Remember, a neat job improves your car’s look and comfort. With effort and care, DIY tinting becomes a rewarding project. Enjoy your tinted windows and the benefits they bring.