If you want to keep your vehicle running smoothly and avoid costly repairs, changing your differential fluid is a must. Your differential works hard to transfer power from the engine to the wheels, and over time, the fluid inside can get dirty or break down.
This can lead to noisy gears, poor handling, or even serious damage. But don’t worry—changing your differential fluid is easier than you think, and you can do it yourself with just a few tools and some basic know-how. You’ll learn exactly how to change your differential fluid step-by-step, so you can save money and protect your ride.
Ready to get started? Let’s dive in!
When To Change Fluid
Knowing when to change your differential fluid helps keep your vehicle running smoothly. The fluid lubricates gears inside the differential, preventing wear and damage. Over time, the fluid breaks down and loses its effectiveness. Changing it at the right time protects your differential and extends its life.
Typical Intervals
Most manufacturers suggest changing differential fluid every 30,000 to 60,000 miles. Some newer vehicles allow longer intervals, up to 100,000 miles. Always check your owner’s manual for exact recommendations. Sticking to these intervals helps avoid costly repairs.
Signs Fluid Needs Changing
Look for dark or dirty fluid during inspection. Clean fluid is usually clear or amber colored. A burnt smell can mean the fluid is overheated. Strange noises like whining or grinding also signal fluid problems. Difficulty turning or unstable handling can indicate worn fluid too.
Severe Driving Conditions
Driving in tough conditions wears out differential fluid faster. Frequent towing, off-roading, or driving through deep water adds stress. Heavy loads and stop-and-go traffic also speed up fluid breakdown. In these cases, change the fluid more often than the usual schedule.
Tools And Materials
Changing differential fluid requires specific tools and materials. Having the right items ready makes the job smoother and safer. This section covers the types of gear oils, essential tools, and safety gear needed for the task.
Required Gear Oil Types
Use gear oil recommended by your vehicle’s manual. Common types include 75W-90 and 80W-90. Some differentials need synthetic oil for better protection. Check if your differential needs limited-slip additive. Using the wrong oil can damage the gears.
Essential Tools
A drain pan collects old fluid during the change. A socket wrench or ratchet removes the fill and drain plugs. Use a fluid pump or squeeze bottle to add new oil. Clean rags help wipe away spills and dirt. A jack and stands lift the vehicle for better access.
Safety Equipment
Wear gloves to protect your hands from hot fluid and chemicals. Safety glasses keep dirt and fluid out of your eyes. Use wheel chocks to stop the vehicle from moving. Work in a well-ventilated area to avoid inhaling fumes. Proper safety prevents accidents and injuries.
Preparing Your Vehicle
Preparing your vehicle properly is the first step to change differential fluid safely. Taking time to set up your car will make the job easier and prevent accidents. Follow these simple steps before starting the fluid change.
Choosing A Level Surface
Park your vehicle on a flat, level surface. This ensures the fluid drains fully and evenly. Avoid slopes or uneven ground to keep your car stable. A driveway or garage floor works well for this task.
Engaging Parking Brake
Apply the parking brake firmly. This stops the vehicle from rolling during the process. Double-check that the wheels cannot move. Safety is key when working under your car.
Lifting And Supporting Vehicle
Use a jack to lift the rear of your vehicle carefully. Place jack stands under solid points for support. Never rely on the jack alone to hold the car up. Ensure the vehicle is secure before crawling underneath.

Credit: www.youtube.com
Draining Old Fluid
Draining old differential fluid is the first key step in changing your vehicle’s differential oil. Removing the old fluid clears out dirt and metal particles. This prevents damage and keeps the differential working smoothly. Follow the right order to avoid spills and ensure all the fluid drains properly.
Locating Fill And Drain Plugs
Start by finding the fill and drain plugs on the differential. The fill plug is usually higher up on the differential case. The drain plug sits at the bottom to let fluid flow out easily. Check your vehicle manual if you cannot see them clearly. Proper location is important for safe fluid removal.
Loosening Fill Plug First
Loosen the fill plug before removing the drain plug. This step prevents air from locking inside the differential. Use the correct size wrench or socket to avoid stripping the plug. If the fill plug is stuck, apply some penetrating oil and wait a few minutes. Loosening it first makes sure you can refill the fluid later.
Removing Drain Plug Or Cover
Place a drain pan under the drain plug to catch old fluid. Slowly unscrew the drain plug or remove the cover plate. Let all the fluid drain out fully. Some vehicles may have a cover instead of a plug. Remove it carefully to avoid damaging the gasket or seal. Wait until no more fluid drips before reinstalling parts.
Cleaning And Inspecting
Cleaning and inspecting the differential is a crucial step before adding new fluid. Dirt, old fluid, and damage can cause poor performance. Thorough cleaning helps ensure a tight seal and smooth operation. Careful inspection reveals any wear or cracks that could lead to leaks or failure. Take your time to prepare the surfaces properly for the best results.
Cleaning Mating Surfaces
Start by wiping the mating surfaces with a clean rag. Remove all dirt, oil, and debris. Use brake cleaner or a similar solvent for stubborn grime. Avoid scratching the metal surfaces. Clean surfaces help create a strong, leak-free seal.
Inspecting For Damage
Check the differential cover and housing closely. Look for cracks, dents, or corrosion. Examine the bolt holes for any damage. Small cracks can cause leaks later. If you see damage, replace the affected parts before proceeding.
Removing Old Gasket Residue
Use a plastic scraper to remove old gasket material. Avoid metal tools that can gouge the surface. Scrape gently until the surface is smooth and clean. Residue can prevent the new gasket from sealing properly. Clean surfaces make a big difference in preventing leaks.
Applying New Seal
Applying a new seal is a key step when changing differential fluid. This step prevents leaks and keeps the fluid clean inside. A proper seal ensures the differential works well for a long time. Take your time to apply the seal carefully for the best results.
Using Rtv Or New Gasket
Choose between RTV silicone or a new gasket for sealing. RTV works well on clean, flat surfaces. Apply a thin, even bead around the cover edge. Avoid thick layers to prevent squeeze-out inside the differential.
If your differential uses a gasket, replace it with a new one. Make sure the gasket matches your cover perfectly. Clean old gasket material fully before placing the new one. This helps avoid leaks and ensures a tight fit.
Sealing The Cover Properly
Place the cover carefully on the differential housing. Align bolt holes to avoid twisting the gasket or seal. Hand-tighten bolts first to keep the cover in place.
Tighten bolts in a crisscross pattern. This spreads pressure evenly and prevents warping. Use a torque wrench to tighten bolts to the manufacturer’s recommended setting. Over-tightening can damage the seal or cover.
After sealing, check for any excess RTV or gasket material. Clean off any squeeze-out to keep the area neat. Proper sealing stops fluid leaks and protects your differential.
Refilling Differential
Refilling the differential is a crucial step after draining the old fluid. It ensures the gears stay lubricated and protected. Using the right amount and type of fluid helps maintain smooth operation.
Proper refilling prevents leaks and avoids overfilling, which can cause pressure issues inside the differential. Follow each step carefully to keep your vehicle running well.
Selecting Correct Fluid Amount
Check your vehicle’s manual for the exact fluid amount. Different models need different quantities. Use the recommended type of differential fluid to match your car’s specifications. Using the wrong fluid can damage gears and seals.
Filling Until Overflow
Remove the fill plug on the differential housing. Slowly pour fluid into the fill hole. Fill until the fluid starts to overflow slightly. This ensures the differential is full without overfilling. Clean any spilled fluid immediately to avoid dirt buildup.
Tightening Fill Plug
Replace the fill plug after refilling. Tighten it securely but avoid over-tightening. Over-tightening can strip the threads or damage the plug. Use a torque wrench if available to get the correct tightness. This step prevents leaks and keeps the fluid inside.
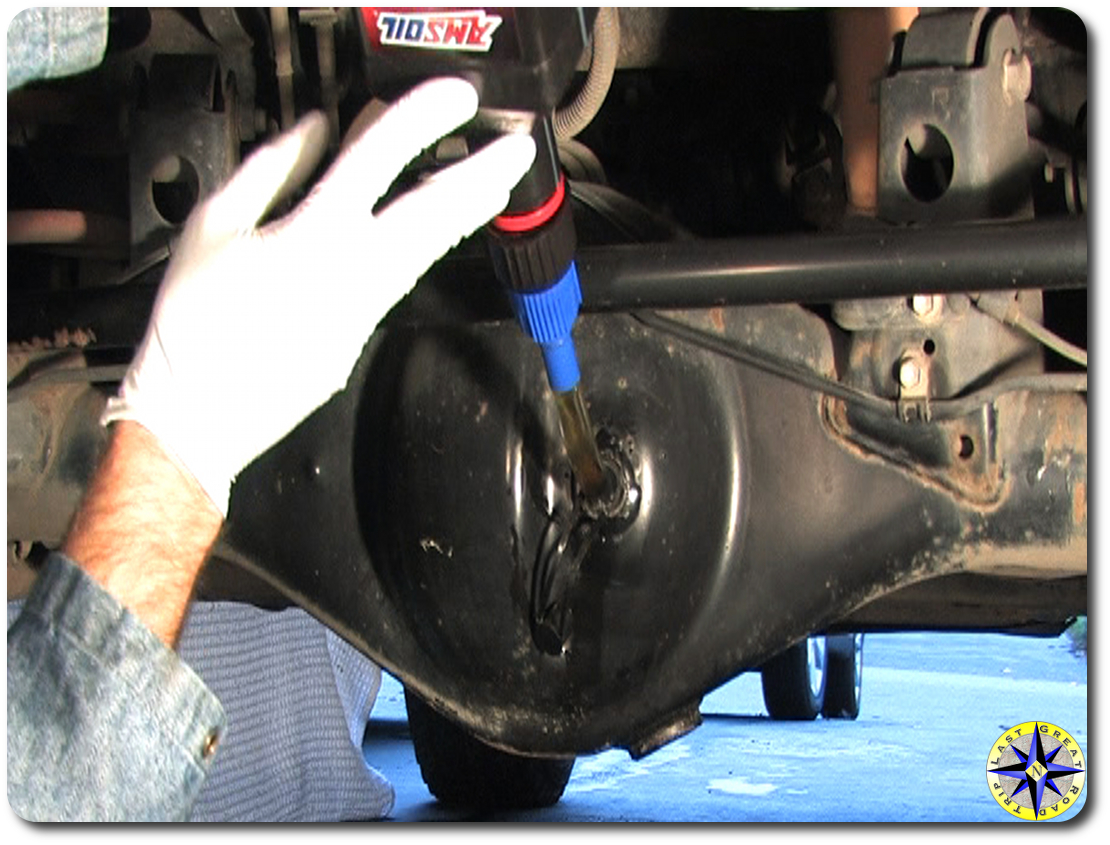
Credit: www.lastgreatroadtrip.com
Post-service Checks
After changing the differential fluid, performing post-service checks is essential. These steps confirm the job was done correctly. They help avoid future problems and ensure the vehicle runs smoothly. Taking time for these checks protects your differential and extends its life.
Checking For Leaks
Inspect the differential area carefully for any fluid leaks. Look under the vehicle and around the fill and drain plugs. Leaks can cause fluid loss and damage the differential. Tighten any loose plugs or replace damaged seals immediately. A leak-free differential means the fluid change was sealed properly.
Test Driving Vehicle
Take the vehicle for a short drive on different road types. Listen for unusual noises such as whining or grinding sounds. Notice if the vehicle handles smoothly, especially when turning corners. Test driving helps detect issues that might not appear when the vehicle is still. It confirms the differential fluid is working well.
Monitoring Fluid Condition
After driving, check the fluid level and condition again. Fluid should be clean and at the correct level. Dark, thick, or burnt-smelling fluid means it needs replacing. Regularly monitoring fluid prevents damage and keeps the differential healthy. Keep a record of each fluid check for future reference.
Tips For Lasting Performance
Maintaining your differential fluid ensures smooth and reliable performance. Proper care extends the life of your vehicle’s differential. Follow these simple tips to keep your differential fluid effective for a long time.
Regular Inspection
Check your differential fluid regularly to spot early issues. Look for fluid leaks around the differential housing. Inspect the fluid color and consistency during maintenance. Clean, clear fluid usually means healthy differential parts. Dark or dirty fluid signals the need for a change. Regular checks help avoid costly repairs later.
Avoiding Contamination
Keep the differential fluid free from dirt and water. Make sure the fill and drain plugs seal tightly. Replace damaged seals promptly to prevent leaks. Use clean tools and containers when changing fluid. Contaminants can cause wear and reduce fluid effectiveness. Clean fluid protects your differential gears and bearings.
Adapting To Driving Conditions
Adjust your fluid change schedule based on driving habits. Heavy towing or off-road driving stresses the differential more. Change the fluid more often if you drive in harsh conditions. Hot climates can cause fluid to break down faster. Follow your vehicle manual recommendations for severe use. Tailoring maintenance to conditions keeps your differential healthy.
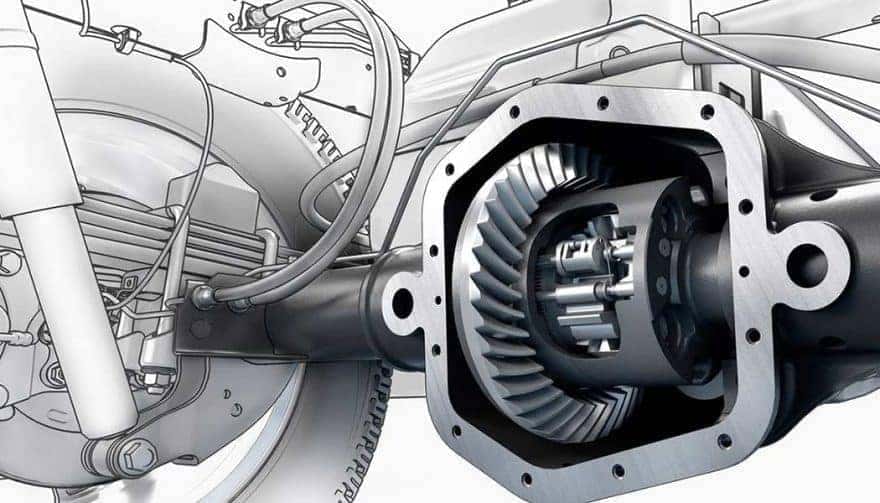
Credit: www.keystonechevrolet.com
Frequently Asked Questions
How Often Should Differential Fluid Be Changed?
Change differential fluid every 30,000 to 60,000 miles or as your vehicle’s manual recommends. Change sooner under heavy towing or off-road conditions.
Can I Change Differential Oil Myself?
Yes, you can change differential oil yourself. Use the correct fluid, tools, and follow steps carefully for best results.
What Are The Symptoms Of Needing Differential Fluid Change?
Symptoms of needing a differential fluid change include whining or grinding noises, burnt smell, dark or contaminated fluid, and poor vehicle handling.
Do I Really Need To Change Rear Diff Fluid?
Yes, changing rear differential fluid protects gears and extends differential life. Follow your vehicle’s recommended service intervals.
Conclusion
Changing differential fluid keeps your vehicle running smoothly. Clean fluid prevents wear and tear on gears. Regular checks help spot problems early. Follow your car’s manual for the right schedule. Use the correct fluid type for best results. Changing fluid yourself saves money and adds confidence.
Keep your differential healthy for safer, longer drives. Simple steps protect your investment and avoid costly repairs. Don’t skip this important maintenance task. Your vehicle will thank you with better performance.