Imagine you’re all set to head out, and suddenly your car won’t start. Frustrating, right?
But don’t panic—knowing how to jump start a car can save you from being stuck and calling for help. This simple skill puts you in control and can turn a stressful moment into a quick fix. In this guide, you’ll learn clear, step-by-step instructions to safely jump start your car, even if you’ve never done it before.
Stick with me, and you’ll be ready to handle a dead battery like a pro whenever it happens to you.
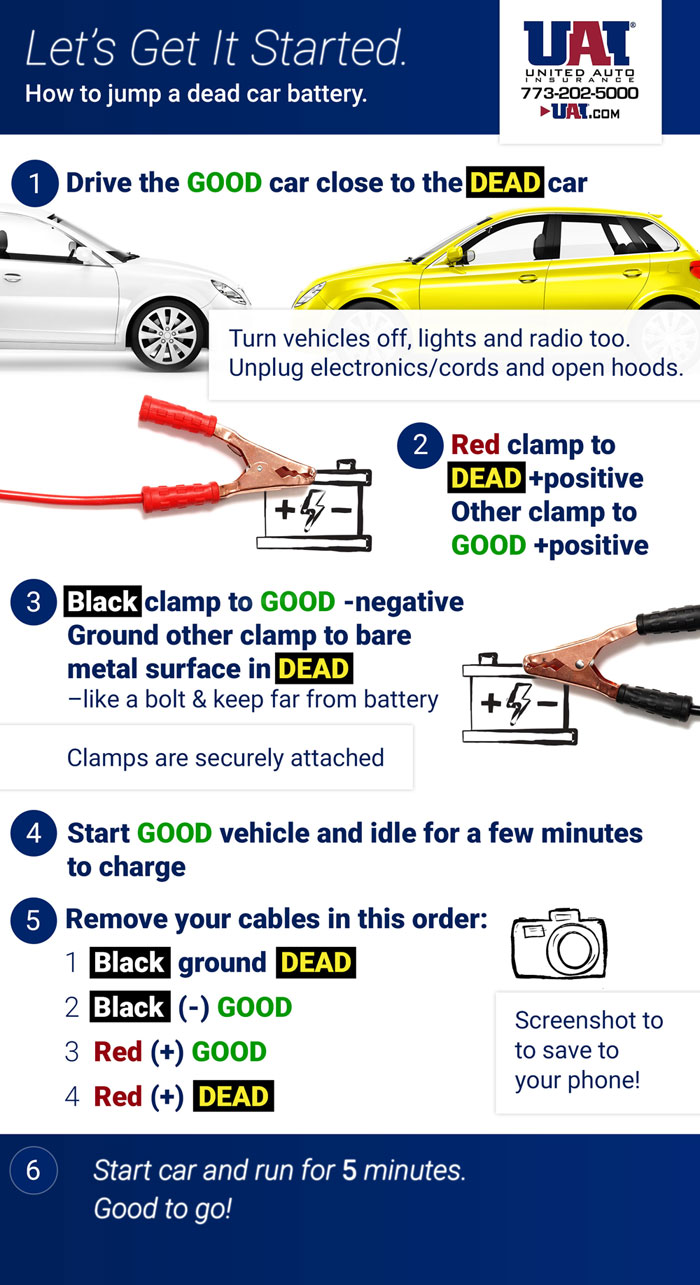
Credit: www.unitedautoinsurance.com
Prepare Vehicles
Preparing the vehicles is the first step to jump start a car safely. Both cars must be positioned correctly. This prevents accidents and ensures the cables reach both batteries. Proper preparation helps the jump start process go smoothly.
Take time to check the surroundings and the cars. Safety is the priority before connecting any cables. Follow these steps carefully for the best results.
Position Cars Safely
Park the working car close to the dead car. Keep a small gap between the two. Do not let the cars touch. This avoids any electrical issues. Align the cars so the batteries face each other.
Make sure the area is flat and stable. Avoid busy roads or slopes. This keeps the cars steady during the jump start.
Turn Off Engines And Engage Parking Brakes
Turn off both car engines completely. This prevents sparks or electrical damage. After turning off, set the parking brakes on both cars. This stops the cars from moving.
Double-check that all lights and accessories are off. This saves battery power and avoids short circuits. Once the cars are secure, open the hoods to access the batteries.
Credit: www.reddit.com
Locate Battery Terminals
Finding the battery terminals is the first step to jump-start a car. The battery holds the power your car needs to start the engine. Knowing where the terminals are helps you connect the jumper cables correctly. This avoids damage and keeps you safe.
Car batteries usually sit under the hood. Sometimes, they are in the trunk or under a seat. Look for a rectangular box with two metal posts on top or on the side. These posts are the battery terminals.
Identify Positive And Negative Posts
The battery has two posts: positive and negative. The positive terminal has a plus sign (+). It often has a red cover or red cable attached. The negative terminal has a minus sign (–). It usually has a black cover or black cable.
It is important to connect the cables to the right terminals. Red clamp goes to positive (+) and black clamp goes to negative (–). Mixing them up can cause sparks or damage the car’s electrical system.
Remove Terminal Covers If Needed
Some batteries have plastic covers on the terminals. These covers protect the battery and prevent accidental contact. You need to remove them before attaching the jumper cables.
Use your fingers or a small tool to lift the cover carefully. Do not force or break the cover. Put the covers aside in a safe place to use later after jump-starting.
Connect Jumper Cables
Connecting jumper cables correctly is key to jump-starting a car safely. Follow each step carefully to avoid sparks or damage. The order of attachment matters for both safety and success.
Always check that both vehicles are off and in park. Engage parking brakes before opening the hoods. Identify the positive (+) and negative (-) battery terminals on both cars.
Attach Red Clamp To Dead Battery Positive
Find the positive (+) terminal on the dead battery. Clamp the red jumper cable securely onto this terminal. Ensure the connection is tight and does not slip.
Attach Red Clamp To Donor Battery Positive
Locate the positive (+) terminal on the donor battery. Attach the other red clamp firmly to this terminal. This completes the positive cable connection.
Attach Black Clamp To Donor Battery Negative
Now, connect one black clamp to the negative (-) terminal on the donor battery. Make sure the clamp grips the terminal well without slipping off.
Attach Black Clamp To Ground On Dead Car
Do not attach the last black clamp to the dead battery’s negative terminal. Instead, find a clean, unpainted metal part on the dead car’s engine block or frame. Clamp the black cable there to ground the connection safely.
Start Donor Vehicle
Starting the donor vehicle is the key step in jump starting a car. It supplies the power needed to charge the dead battery. The donor car’s engine must run to provide a steady flow of electricity. This ensures the dead battery gains enough charge to start the vehicle. Follow the proper steps carefully to avoid damage or injury.
Let Engine Run For A Few Minutes
After connecting the jumper cables, start the donor vehicle’s engine. Let it run for about 3 to 5 minutes. This time allows the dead battery to receive a good charge. Keep the engine steady and avoid revving it too high. A slow, steady charge works best for jump starting.
Do not rush to start the dead car immediately. Waiting helps build enough power. If the dead car does not start after a few minutes, wait a little longer. This process improves the chances of a successful jump start.
Start Dead Vehicle
A dead vehicle battery can stop your day fast. Knowing how to jump start it saves time and stress. First, connect the jumper cables safely and in the right order.
Make sure the working car is close but not touching the dead one. Both cars must be off with parking brakes set. Open the hoods and find the battery terminals.
Attempt To Start Engine
After connecting cables, start the engine of the working car. Let it run for about 3 to 5 minutes. This charges the dead battery slowly.
Next, try to start the dead vehicle’s engine. If it turns over, you’re on the right track. Keep the engine running to let the battery charge more.
Wait And Retry If Necessary
If the dead car does not start, wait a few more minutes. Keep the working car’s engine running during this time. This gives the dead battery more charge to start.
Try starting the dead vehicle again after waiting. Repeat the process if needed, but avoid long continuous attempts. This prevents damage to the starter or battery.
Disconnect Jumper Cables
Disconnecting the jumper cables is the final step after jump starting a car. This step must be done carefully to avoid sparks or damage. Always remove the cables in the reverse order of how you connected them. This keeps the process safe and prevents electrical shocks. Follow these simple steps to disconnect the jumper cables properly.
Remove Black Clamp From Ground
First, take off the black clamp attached to the dead car’s metal ground. This clamp is usually connected to an unpainted metal surface on the engine block or frame. Removing it first reduces the risk of sparks near the battery. Pull the clamp away gently and place it aside.
Remove Black Clamp From Donor Battery
Next, remove the black clamp from the negative terminal of the donor battery. This is the battery in the working car. Carefully pull the clamp off the terminal. Avoid letting the clamps touch each other or any metal surface during removal.
Remove Red Clamp From Donor Battery
Now, take off the red clamp from the positive terminal of the donor battery. This clamp was connected to the working car’s battery. Pull it off slowly and safely. Keep the clamp away from any metal parts to prevent sparks.
Remove Red Clamp From Dead Battery
Finally, remove the red clamp from the positive terminal of the dead battery. This is the last clamp to remove. Gently pull it away and store all cables properly. This completes the jump start process safely and correctly.
Charge Battery After Jump
After successfully jump starting your car, the battery needs time to recharge. Driving immediately helps restore its power. A charged battery ensures your car starts again without trouble.
Charging the battery after a jump is crucial. The alternator in your car converts engine power into electrical energy. This energy replenishes the battery as you drive. Do not rely solely on the jump start. It only provides a quick boost to get the engine running.
Proper charging extends the battery life. It also prevents future starting problems. Follow simple steps to help the battery regain its full charge.
Drive Without Heavy Electrical Loads
Keep electrical devices off while charging the battery. Avoid using the radio, air conditioning, and headlights. These devices drain power from the battery and slow charging.
Drive at a steady speed on a clear road. Longer drives allow the alternator to charge the battery fully. Short trips do not provide enough time for charging.
Turn off extra electrical loads to let the battery recharge faster. This practice helps the battery regain strength and keeps your car reliable.

Credit: www.reddit.com
Safety Tips
Jump starting a car involves handling electrical components and heavy equipment. Safety must come first to avoid accidents and injuries. Follow these safety tips closely to protect yourself and your vehicle.
Avoid Cable Contact
Keep the jumper cables from touching each other during the process. Contact between cables can cause sparks or short circuits. Always connect cables carefully, one step at a time. Make sure the clamps are secure and do not slip.
Check For Battery Damage
Inspect both batteries before starting. Look for cracks, leaks, or corrosion on battery terminals. Damaged batteries can be dangerous and should not be jump started. If you see any signs of damage, call for professional help.
Wear Protective Gear
Wear gloves and safety glasses to protect your hands and eyes. Battery acid can cause burns and injury. Protective gear reduces risks from sparks and accidental contact. Always choose thick, durable gloves for better safety.
Frequently Asked Questions
What Is The Correct Way To Jump Start A Car?
Park both cars close without touching. Turn off engines and engage parking brakes. Connect red clamp to dead battery’s positive terminal, other red to good battery positive. Attach black clamp to good battery negative, then black clamp to unpainted metal on dead car.
Start donor car, then dead car. Remove cables in reverse order.
What Is The Order When Jump Starting A Car?
Park the working car close without touching. Turn off engines and engage parking brakes. Connect red clamp to dead battery’s positive terminal. Attach other red clamp to donor battery’s positive. Connect black clamp to donor battery’s negative terminal. Attach final black clamp to unpainted metal on dead car.
Start donor car, then the dead car. Remove cables in reverse order.
What Is The Rule When Jump Starting A Car?
Park both cars close without touching. Connect red clamps to positive terminals, black clamp to donor battery negative, and last black clamp to dead car’s metal frame. Start donor car, then dead car. Remove cables in reverse order after starting.
Drive to recharge battery.
What Are Common Mistakes When Jumping A Car?
Common mistakes include reversing cable connections, touching cars together, not grounding properly, rushing the process, and removing cables in the wrong order.
Conclusion
Jump-starting a car is simple when done step-by-step. Always connect the cables in the right order. Keep safety in mind and park cars close but not touching. Let the working car run before trying to start the dead one. If it doesn’t start, wait a few minutes and try again.
Remove cables carefully, reversing the connection steps. Practice these tips to handle battery troubles confidently. Knowing this skill helps in emergencies and saves time. Stay calm and follow the process exactly for best results.