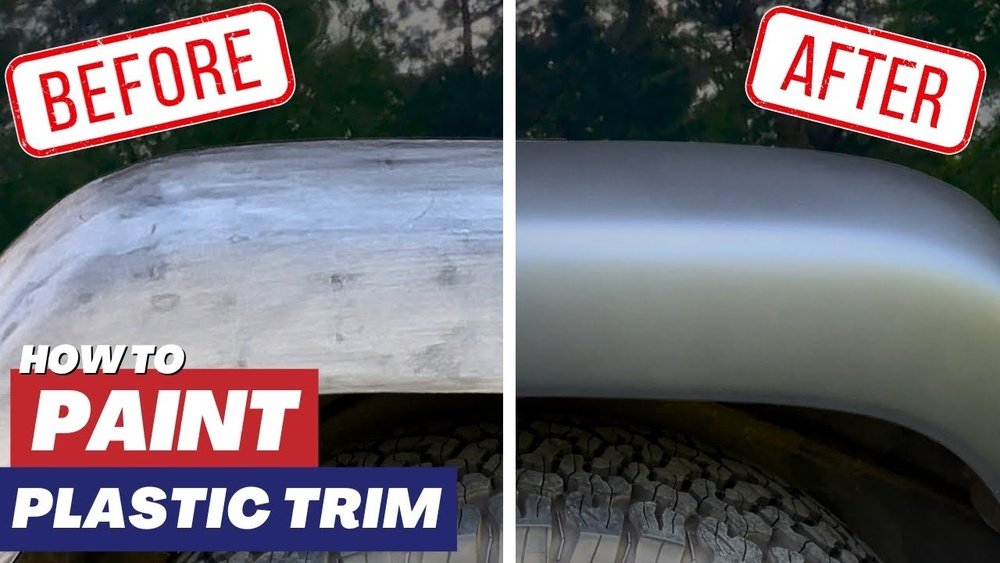
If your plastic trim looks dull, faded, or just plain outdated, you don’t have to replace it. You can give it a fresh, vibrant look with the right paint and technique.
Painting plastic trim might sound tricky, but with the right steps, you can achieve a smooth, long-lasting finish that looks professional. In this guide, you’ll learn how to prepare your plastic trim, choose the best paint, and apply it correctly so your project stands out for all the right reasons.
Ready to transform your plastic trim and boost your space’s appeal? Keep reading, because the solution is easier than you think!

Credit: www.wikihow.com
Choosing Paint For Plastic
Choosing the right paint for plastic trim is key to a smooth, lasting finish. Plastic surfaces need special types of paint that stick well and do not peel off easily. Using the wrong paint can cause cracking or bubbling. This section explains different paint options for plastic trim, helping you pick the best one for your project.
Acrylic Vs Epoxy Options
Acrylic paint works well on plastic trim. It is easy to apply and dries fast. Acrylics offer good color and shine but may not be very tough. Epoxy paint provides a stronger, more durable coat. It resists scratches and weather better than acrylic. Epoxy takes longer to dry and needs careful mixing. For outdoor trim, epoxy is a solid choice.
Spray Paints Made For Plastic
Spray paints designed for plastic create a smooth, even finish. These paints have special formulas that bond tightly to plastic surfaces. Popular brands include Rust-Oleum Universal and Krylon Fusion. Spray paints are quick and simple to use, especially on oddly shaped trim. Make sure to use a primer made for plastic before spraying. This step improves paint adhesion and prevents peeling.
Flexible Paints For Soft Plastics
Soft plastics like vinyl require flexible paints. Flexible paints stretch and move with the plastic without cracking. They are often used on car interiors or rubber trim. These paints keep their color and shape even after bending or stretching. Always check the paint label to confirm it is safe for soft plastic materials. Using flexible paint ensures a neat, long-lasting look.

Credit: mckees37.com
Preparing Plastic Trim
Preparing plastic trim is key to a smooth and lasting paint job. The surface must be clean, smooth, and ready to hold paint. Proper preparation helps the paint stick well and prevents peeling or cracking.
This section explains how to prepare plastic trim before painting. Follow these steps carefully for the best results.
Cleaning And Degreasing
Start by cleaning the plastic trim with soap and water. Remove dirt and dust thoroughly. Use a cloth or sponge to scrub gently. After washing, dry the surface completely.
Next, apply a degreaser or rubbing alcohol. This removes oils and wax that block paint adhesion. Wipe the trim with a clean cloth soaked in degreaser. Let it air dry before moving on.
Sanding Techniques
Light sanding is important to create a rough surface for the paint to grip. Use fine-grit sandpaper, around 400-600 grit. Sand evenly in circular motions. Avoid pressing too hard to prevent damage.
After sanding, wipe the trim with a damp cloth. Remove all dust and particles. This step ensures the primer and paint stick better.
Using Plastic Primer
Apply a plastic primer designed for trim surfaces. This primer bonds paint to plastic and improves durability. Use a spray primer for even coverage.
Hold the spray can 6-8 inches away. Apply thin, light coats. Let each coat dry for 10-15 minutes. Two coats of primer are ideal for strong adhesion.
Once the primer is dry, the plastic trim is ready for painting. This step prevents peeling and extends paint life.
Painting Steps
Painting plastic trim requires careful steps to ensure a smooth and lasting finish. Each phase matters, from applying the paint to drying and avoiding common mistakes. Following the right painting steps helps the paint stick well and look professional.
Applying Thin Coats
Start by spraying or brushing thin coats of paint. Thin layers dry faster and reduce the chance of runs. Hold the spray can or brush about 6 to 8 inches from the trim. Move steadily and evenly. Let each coat cover the surface lightly. Thin coats build color gradually and avoid thick, sticky spots.
Drying Time Between Layers
Allow enough drying time before adding the next coat. Usually, 15 to 30 minutes is enough. Check the paint feels dry to touch but not hard. This step prevents peeling and helps the paint bond well. Patience here improves the final look and durability of your trim paint.
Avoiding Runs And Drips
Apply paint slowly and with controlled pressure. Too much paint at once causes runs and drips. If you see drips starting, stop and smooth them out quickly. Keep the paint layers light and even. Good technique here keeps the trim surface clean and smooth. Use steady hands and small strokes.
Tips For Hard And Soft Plastics
Painting plastic trim requires different care based on the type of plastic. Hard and soft plastics react differently to paint. Understanding these differences helps ensure a smooth, lasting finish. Follow these tips for best results on both types of plastic.
Adhesion On Hard Plastic
Hard plastic needs thorough cleaning before painting. Use soap and water to remove dirt. Sand the surface lightly with fine-grit sandpaper. This creates a rough texture for better paint grip. Apply a plastic primer designed for hard plastics. It improves adhesion and prevents peeling. Use spray paints made for plastic for even coverage. Let each coat dry fully before applying the next. Avoid thick layers to prevent drips and runs.
Preventing Cracks On Soft Plastic
Soft plastics are flexible and prone to cracking if painted incorrectly. Choose flexible paint formulas made for vinyl or rubber. Clean the trim gently to avoid damage. Avoid heavy sanding; light scuffing is enough. Apply a flexible primer to prepare the surface. Use thin coats of paint to maintain flexibility. Allow enough drying time between coats. Avoid stretching the trim while the paint dries. This prevents cracking and peeling later.
Common Mistakes To Avoid
Painting plastic trim can refresh any space or vehicle. Avoiding common mistakes ensures the paint lasts and looks great. Small errors can cause peeling, bubbling, or uneven color. Learn what to skip for the best finish.
Skipping Primer
Primer helps paint stick to plastic surfaces. Without it, paint may peel or chip quickly. Always apply a plastic primer before painting. It creates a smooth base and improves durability. Skipping this step wastes time and effort.
Painting Over Dirty Surfaces
Paint will not stick well to dirt or grease. Clean the trim thoroughly before painting. Use soap and water or a plastic-safe cleaner. Dry the surface completely to avoid bubbles. Painting over dirt causes uneven finish and poor adhesion.
Using Wrong Paint Type
Not all paints work on plastic. Choose paints made for plastic surfaces. Acrylic spray paints or specific plastic paints work best. Regular paint may crack or peel off. Using the wrong paint reduces the lifespan of your work.
Finishing Touches
After painting plastic trim, the final steps make all the difference. Finishing touches protect your work and improve the look. These steps help the paint last longer and feel smooth to touch. Proper finishing ensures your trim looks like new for years.
Sealing The Paint
Sealing the paint protects it from scratches and fading. Use a clear spray sealer made for plastic surfaces. Apply thin, even coats to avoid drips and runs. Let each coat dry fully before adding the next. This layer adds shine and durability to your trim.
Buffing For Smoothness
Buffing smooths out any rough spots or uneven paint. Use a soft cloth or a foam buffing pad. Gently rub the surface in small circles. This step removes dust and minor imperfections. Buffing also gives your trim a polished, professional finish.
Maintenance And Durability
Proper maintenance keeps painted plastic trim looking fresh and lasting longer. Painted surfaces on plastic trim can wear down or fade without care. Regular upkeep ensures durability and preserves the finish. Follow simple steps to clean and protect your trim for lasting beauty.
Cleaning Painted Trim
Use mild soap and water to clean painted plastic trim. Harsh chemicals can damage the paint and cause peeling. Gently wipe with a soft cloth or sponge to remove dirt and grime. Avoid abrasive scrubbers that can scratch the surface. Dry the trim fully to prevent water spots. Regular cleaning prevents buildup that dulls the paint.
Protecting Against Fading
Sunlight and weather can cause painted plastic trim to fade over time. Apply a UV-protectant spray designed for painted surfaces. This creates a barrier against sun damage and keeps colors vibrant. Reapply the protectant every few months for best results. Park in shaded areas or use car covers to reduce sun exposure. Proper protection extends the life and appearance of your painted trim.

Credit: www.youtube.com
Frequently Asked Questions
Can Plastic Trim Be Painted?
Yes, plastic trim can be painted by cleaning, priming with plastic primer, and using paint designed for plastic surfaces.
What Kind Of Paint Adheres Best To Plastic?
Specialized acrylic or spray paints made for plastic, like Rust-Oleum Universal or Krylon Fusion, adhere best. Use a plastic primer first for strong bonding. Epoxy paints work well for durability, while flexible paints suit soft plastics to prevent cracking. Clean and prep surfaces thoroughly before painting.
Do I Need To Sand Before Painting Plastic?
Yes, lightly sand plastic before painting to create a rough surface. This improves paint adhesion and durability. Use fine-grit sandpaper and clean the plastic afterward.
Can You Paint Directly Over Plastic?
You cannot paint directly over plastic without preparation. Clean the surface, apply a plastic primer, then use paint designed for plastic. Use flexible paint for soft plastics and spray in light, even coats for best results.
Conclusion
Painting plastic trim can refresh its look and extend its life. Start by cleaning and sanding the surface well. Use a primer made for plastic to help paint stick better. Choose paint designed specifically for plastic for lasting results. Apply thin, even coats and let each dry fully before the next.
Take your time, and the finish will look smooth and professional. With these simple steps, your plastic trim will look like new again. Enjoy the fresh, clean appearance and protect your trim from wear. Painting plastic trim is easy with the right tools and care.