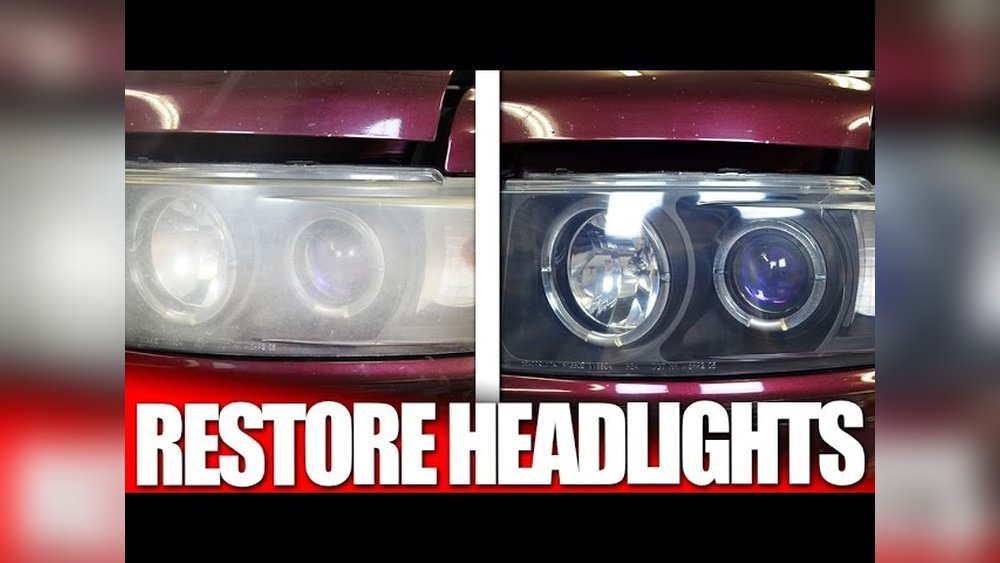
Are your headlights looking dull, cloudy, or yellowed? Oxidized headlights don’t just make your car look older—they can also reduce your visibility and safety on the road.
The good news is, you don’t have to spend a fortune replacing them. You can restore your headlights to clear, bright condition right at home. In this guide, you’ll discover simple, effective methods to remove oxidation and bring back that crisp shine.
Whether your headlights have just started to fog or are heavily oxidized, you’ll find easy steps that anyone can follow. Keep reading to learn how to make your headlights look like new again—and drive safer every night.
Credit: www.detailedimage.com
Causes Of Headlight Oxidation
Headlight oxidation happens when the clear plastic lens gets cloudy or yellow. This makes headlights less bright and reduces night driving safety. Understanding what causes this oxidation helps prevent damage and keeps headlights clear longer.
Sunlight And Uv Exposure
Sunlight is the main cause of headlight oxidation. UV rays break down the plastic’s surface over time. This causes the clear layer to peel and turn yellow. Cars parked outside without shade face more damage.
Environmental Factors
Dirt, dust, and road chemicals also wear down headlights. Rain and snow can trap grime on the lens. Pollution in the air adds to the damage. These factors make the plastic weaker and duller.
Material Wear And Tear
Headlights face daily wear from driving and cleaning. Small scratches and impacts harm the plastic layer. Harsh cleaning products or rough cloths make the lens cloudy. Over years, these effects cause oxidation.
Signs Of Oxidized Headlights
Oxidized headlights show clear signs that affect both appearance and function. Recognizing these signs early helps in restoring headlights effectively. Damaged headlights reduce visibility and car safety during night driving. Below are the common signs to spot oxidized headlights on your vehicle.
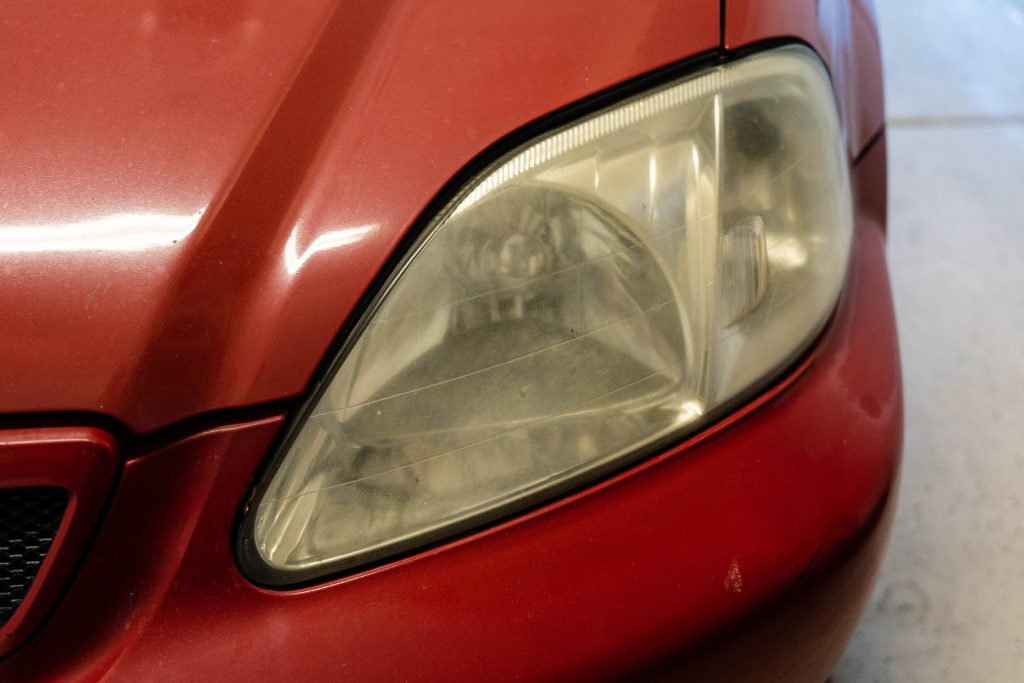
Cloudy Or Hazy Appearance
Oxidation causes the headlight lens to lose its clarity. The surface looks dull, cloudy, or hazy instead of clear. This happens due to sun exposure breaking down the plastic coating. Cloudy headlights make your car look older and less cared for.
Reduced Light Output
Oxidized headlights block the light from shining bright. The beam becomes weak and dim, reducing your visibility on dark roads. Less light means you may miss obstacles or road signs, increasing the risk of accidents. Bright headlights are crucial for safe driving at night.
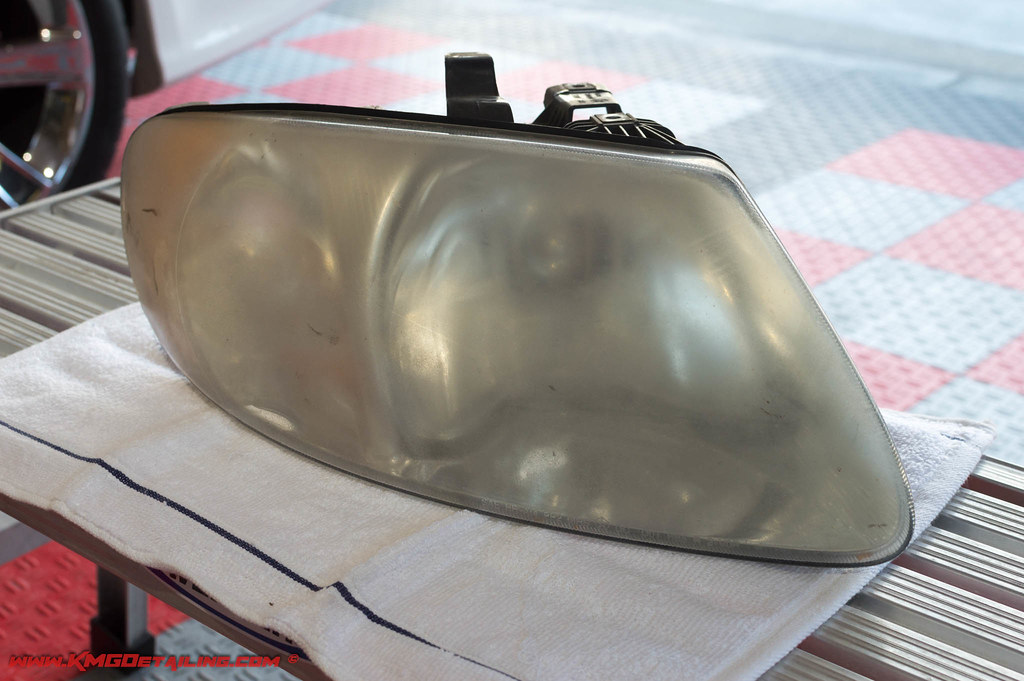
Surface Scratches And Yellowing
Oxidation often causes tiny scratches on the headlight lens. These scratches scatter the light, making it less effective. The plastic may also turn yellow over time. Yellow headlights look dirty and further lower the quality of light emitted. Both scratches and yellowing need attention to restore clarity.
Basic Cleaning Methods
Restoring oxidized headlights starts with simple cleaning methods anyone can do. These basic steps remove surface dirt and light oxidation. They prepare the headlights for deeper restoration if needed. Using household items saves money and avoids harsh chemicals. Follow these easy techniques to brighten your headlights quickly.
Washing With Soap And Water
Begin by rinsing the headlights with water. Use a mild soap mixed with water. Apply the soapy water using a soft cloth or sponge. Gently scrub the headlight surface to remove dirt and grime. Rinse thoroughly with clean water. Dry the headlights with a microfiber towel. This step clears loose debris that blocks light.
Using Toothpaste As A Mild Abrasive
Toothpaste works as a gentle polish for headlights. Apply a small amount of white, non-gel toothpaste on a soft cloth. Rub the toothpaste onto the headlight in small circular motions. Continue scrubbing for several minutes to remove oxidation. Rinse the headlight with water and dry it well. Toothpaste helps clear cloudiness and improves brightness.
Baking Soda Paste Application
Mix baking soda with water to make a thick paste. Spread the paste evenly on the headlight surface. Use a soft cloth to rub in small circles. This method gently removes surface oxidation and dirt. Let the paste sit for a few minutes before rinsing. Wash off all baking soda residue with clean water. Dry the headlights to finish. Baking soda is a natural cleaner that brightens headlights safely.
Diy Abrasive Techniques
DIY abrasive techniques offer a simple way to restore oxidized headlights at home. These methods remove the cloudy layer caused by oxidation. They use common household items or automotive products. The results often surprise car owners. Clear headlights improve both appearance and safety on the road.
Scrubbing With Vinegar And Baking Soda Mix
Start by mixing vinegar and baking soda into a paste. Apply this paste to the headlight surface. Use a soft cloth or sponge to scrub gently. Move in small circles to break down oxidation. After scrubbing, rinse with clean water. Dry the headlights with a microfiber towel. This natural mix helps remove grime and light oxidation.
Applying Automotive Restoration Compounds
Automotive restoration compounds are made for headlight cleaning. Apply a small amount to a clean cloth or applicator pad. Rub the compound over the headlight in circular motions. The compound contains mild abrasives that polish away the haze. Work slowly to cover the entire surface. Wipe off any excess with a clean towel. These compounds give a smoother, clearer finish than household items.
Buffing With Circular Motions
Buffing enhances clarity and smoothness after scrubbing or applying compounds. Use a microfiber cloth or a buffing pad attached to a drill. Move the cloth or pad in steady, circular motions. Apply light to moderate pressure for best results. Buff until the headlight looks shiny and clear. Finish by wiping the surface clean. Buffing brings out the shine and removes fine scratches.
Using Restoration Kits
Using restoration kits is an easy way to clear up oxidized headlights. These kits come with all the materials needed for cleaning and protecting your headlights. Following the steps carefully can bring back brightness and improve night driving safety.
Preparing The Headlight Surface
Start by washing the headlights with soap and water. Remove dirt and grime for better results. Dry the surface completely using a clean cloth. Mask the area around the headlights with tape to avoid scratches.
Applying Compound And Buffing
Apply the compound included in the kit onto the headlight lens. Use a soft cloth or the provided applicator. Rub in small circular motions to remove oxidation. Buff the surface gently until you see the haze fading. Wipe off any excess compound with a clean cloth.
Sealing With Uv Protectant
After cleaning, apply the UV protectant from the kit. This step helps keep headlights clear for a longer time. Use a clean cloth to spread the sealant evenly. Let it dry completely before driving. Regular application of UV protectant prevents future yellowing and damage.
Credit: www.detailedimage.com
Advanced Restoration Steps
Advanced restoration steps bring your headlights closer to a like-new condition. These methods remove deeper oxidation and restore clarity beyond basic cleaning. They involve careful sanding, polishing, and sealing to protect your headlights for longer.
Wet Sanding With Fine-grit Sandpaper
Start by wet sanding the headlight lens with fine-grit sandpaper. Use 1000 to 3000 grit for the best results. Keep the surface and sandpaper wet to avoid scratches. Sand gently in a circular motion to remove the top oxidized layer. This step smooths out rough patches and prepares the surface for polishing.
Polishing For Scratch Removal
After sanding, apply a polishing compound to remove fine scratches. Use a soft cloth or a polishing pad with an orbital buffer. Work the polish in small circles until the lens becomes clear and shiny. Polishing restores smoothness and transparency, making the headlights look new again.
Applying Clear Coat For Longevity
Finish by applying a clear coat to protect the headlights from future damage. Choose a UV-resistant clear coat spray designed for headlights. Apply thin, even layers and let each dry before adding the next. The clear coat seals the surface and keeps oxidation from returning quickly.
Preventing Future Oxidation
Preventing future oxidation is key to keeping headlights clear and bright. After restoring headlights, extra care helps avoid quick yellowing or cloudiness. Simple habits and protective products extend the life of your headlights. Small efforts save time and money in the long run.
Regular Cleaning Routine
Clean headlights often with mild soap and water. Dirt and grime can speed up oxidation. Use a soft cloth to avoid scratches. Avoid harsh chemicals that damage the plastic. Regular cleaning keeps headlights looking fresh and clear.
Applying Uv Sealants
UV rays cause the plastic to oxidize and turn yellow. Apply a UV sealant after cleaning or restoration. Sealants protect by blocking harmful sun rays. Reapply every few months for best results. This simple step keeps headlights clear longer.
Protective Parking Tips
Park your car in shaded or covered areas when possible. Avoid direct sunlight for long periods. Use a car cover if no shade is available. Parking away from tree sap and bird droppings also helps. These habits reduce exposure to elements that cause oxidation.

Credit: www.youtube.com
Tools And Materials Needed
Restoring oxidized headlights requires specific tools and materials. Having the right supplies makes the process easier and more effective. Prepare all items before starting to avoid interruptions. This guide covers essential cleaning supplies, recommended restoration kits, and safety gear.
Essential Cleaning Supplies
Start with basic cleaning items like soap and water. Use a microfiber cloth to avoid scratches. Sandpaper with different grits helps remove oxidation layers. Fine grit sandpaper (1000 to 3000) works best. A polishing compound smooths the surface after sanding. You will also need masking tape to protect the car’s paint around headlights.
Recommended Restoration Kits
Restoration kits combine many needed materials in one package. They usually include sanding pads, polishing compounds, and sealants. Choose kits with good reviews and clear instructions. Kits save time by providing all necessary tools together. Using a kit ensures consistent results and protects headlights longer.
Safety Gear
Wear safety glasses to protect your eyes from dust and debris. Use gloves to keep chemicals off your skin. A dust mask prevents inhaling fine particles during sanding. Proper safety gear keeps the restoration process safe and comfortable. Always work in a well-ventilated area to avoid fumes.
Common Mistakes To Avoid
Restoring oxidized headlights improves your car’s look and safety. Many make mistakes that reduce results or cause damage. Avoid these common errors to get clear, bright headlights that last longer.
Skipping Surface Preparation
Cleaning the headlight surface is crucial before any restoration. Dirt and grime block the products from working well. Wash headlights with soap and water first. Dry completely to prevent streaks and uneven polishing. Skipping this step causes poor results and may scratch the lens.
Using Harsh Abrasives Incorrectly
Strong abrasives remove oxidation but can harm headlights if used wrong. Sanding too hard or with rough grit leaves scratches. Always start with fine sandpaper and gentle pressure. Move evenly in small circles to avoid uneven spots. Using harsh abrasives carelessly can make headlights look worse.
Neglecting Uv Protection
UV rays cause oxidation and yellowing of headlights. Restoring without a UV sealant means damage returns quickly. Apply a UV protectant or clear coat after polishing. This layer blocks sun damage and keeps headlights clear longer. Neglecting UV protection wastes your restoration effort.
Frequently Asked Questions
Can Oxidized Headlights Be Restored?
Yes, oxidized headlights can be restored using cleaning, sanding, polishing, and applying a UV sealant to protect them.
Does Wd-40 Clean Oxidized Headlights?
WD-40 can temporarily remove light oxidation from headlights by cleaning surface grime. It does not restore clarity or remove deep oxidation. For lasting results, use a headlight restoration kit with sanding, polishing, and UV sealant. WD-40 is not a proper solution for oxidized headlights.
How Do I Make My Cloudy Headlights Clear Again?
Clean headlights with soap and water. Scrub using toothpaste or baking soda paste in circular motions. Rinse and dry. For severe cloudiness, wet sand with fine-grit sandpaper, polish, then apply UV sealant to protect against future haze.
Will Magic Eraser Restore Headlights?
Magic Eraser can remove surface grime but won’t fully restore oxidized headlights. Use sanding and polishing for best results.
Conclusion
Restoring oxidized headlights improves both safety and car appearance. Regular cleaning stops haze buildup. Simple DIY methods save money and time. Use gentle abrasives and always protect with a sealant. Bright headlights help you see better at night. Clear lenses also make your car look newer.
Keep your headlights in good shape for safer driving. Try these easy steps and enjoy clearer vision on the road.